

To sharpen a kitchen knife with a rod, hold the rod firmly and slide the knife down at a 20-degree angle. Perform this action repeatedly on both sides of the blade.
Properly maintaining your kitchen knives ensures they cut with precision and safety. A dull knife can be a hazard in the kitchen, leading to slips and uneven cutting. A sharpening rod, often called a honing steel, is a key tool for keeping your blades in top shape.
It doesn’t actually sharpen the blade but rather straightens the edge, realigning micro-sized bends. Regular honing extends the time between actual sharpening. Even beginners can master this essential skill with a little practice; it’s about maintaining a consistent angle and using smooth, controlled strokes. Ensuring your knives are properly honed contributes significantly not only to the efficiency of your food preparation but also to the enjoyment of your cooking experience.
I. Introduction to Best way to sharpen a kitchen knife with rod
Mastering the art of knife sharpening can elevate your culinary skills. This guide unlocks the technique to effectively sharpen kitchen knives using a rod, ensuring precision and safety in your meal preparations.
The Vitality Of Keeping Your Blades Sharp
A sharp kitchen knife is a cornerstone of proficient cooking—gliding with ease through ingredients and ensuring precise cuts every time. Dull knives, on the other hand, can be a cook’s worst enemy, leading not only to inconsistent slices but also to an increased risk of accidents.
Sharpening your knives with a rod, also known as honing, is a fundamental skill that maintains the edge of your blade between more intensive sharpenings and can prolong the life of your kitchen tools.
Choosing The Right Sharpening Rod
- Material Type: Consider the material of the rod, which affects its abrasive qualities and compatibility with your knives.
- Length of Rod: Ensure the rod is long enough to accommodate the full length of your knife blade for effective sharpening.
- Handle Grip: Look for a rod with a comfortable and secure handle to prevent slipping during the honing process.
The Art Of Honing With A Rod
Honing a knife is more than just a mundane task; it’s an art that, when mastered, transforms the chore into a small ritual of preparation, enhancing your cooking experience. Here’s a step-by-step guide to reshaping your knife’s edge and keeping it at the ready for your culinary endeavors.
Aligning Knife And Rod
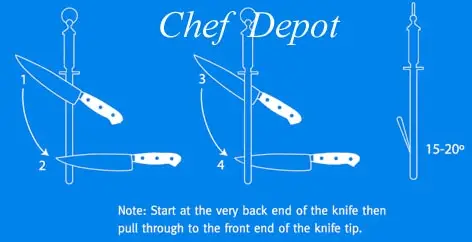
- Set the Angle: Place your knife against the rod at approximately 15-20 degrees for an optimal honing angle.
- Consistent Contact: Ensure the blade is in full contact with the rod from the heel to the tip throughout each stroke.
Smooth, Controlled Motion
A harmonious motion is paramount when drawing the knife across the rod. Start with the heel against the top of the rod, then sweep down and across smoothly, finishing with the tip of the knife at the bottom of the rod.
Alternate this motion on both sides of the blade to maintain an even edge, remembering that a gentle, regular pass is superior to forceful strokes.
Frequency Of Honing
- Regular Maintenance: Honing after every couple of uses keeps the edge aligned and the knife performing at its best.
- Assessing the Need: Pay attention to the ease of cutting. Resistance or squashing during slicing signals it’s time to hone the blade.
By integrating these honing steps into your kitchen routine, your knives will be dependably sharp, safe, and enjoyable to use, making your cooking both more efficient and more pleasurable. Embrace the craft of keeping your blades in top form and take pride in the maintenance of your culinary tools.
A. Importance Of Sharp Kitchen Knives
Sharp knives are essential for efficient and safe food preparation. Learning how to use a honing rod ensures your blades remain razor-sharp, enhancing kitchen performance and preventing accidents caused by dullness.
Understanding the essence of a well-kept kitchen, the sharpness of your knives is paramount. It dictates not only the efficiency of your food preparation but also your safety. A blade that has lost its sharpness demands additional pressure to cut, elevating the chances of potential accidents.
Let’s delve into why maintaining razor-sharp blades can make a world of difference in your culinary pursuits.
Sharp kitchen knives are not just a chef’s delight; they’re a must-have for anyone who loves to cook. A dull knife can turn meal prep into a chore, slow you down, and compromise the presentation of your dishes. Here are the key reasons to keep your knives in top condition:
- Efficiency and Speed: A sharp knife glides through ingredients, enabling quick and precise cuts. This leaves you with beautifully chopped or sliced veggies that cook evenly.
- Safety: It may seem counterintuitive, but a sharper knife is safer. It’s predictable and requires less force, reducing the risk of slipping and causing injury.
- Food Quality: Delicate ingredients like herbs keep their vibrant color and structure when cut with a sharp blade, as it doesn’t bruise the cells.
- Comfort and Ease: A sharp knife is more comfortable to use as it does not cause undue strain on your hands and wrists, making the cooking experience more enjoyable.
Embracing the significance of keen-edged cutlery not only transforms the process of preparing meals but elevates the end result on your plate. Sharpening your kitchen knife with a rod is a skill that guarantees your blade’s longevity and your effectiveness as a cook.
B. Introducing The Rod Sharpening Technique
Discover the rod sharpening method—a quick, effective way to maintain your kitchen knife’s edge. Master this simple technique to ensure your blades are always ready for precise slicing.
Understanding The Basics Of Rod Sharpening
Before diving into the sharpening process, it’s vital to comprehend what a sharpening rod is and how it differs from other sharpening tools. Unlike a whetstone or electric sharpener, a rod—often made of steel or ceramic—is designed to hone a knife’s edge, which straightens and smooths the blade rather than removing significant amounts of metal.
This daily maintenance tool keeps knives in peak condition between more intensive sharpening sessions.
Preparing For Rod Sharpening
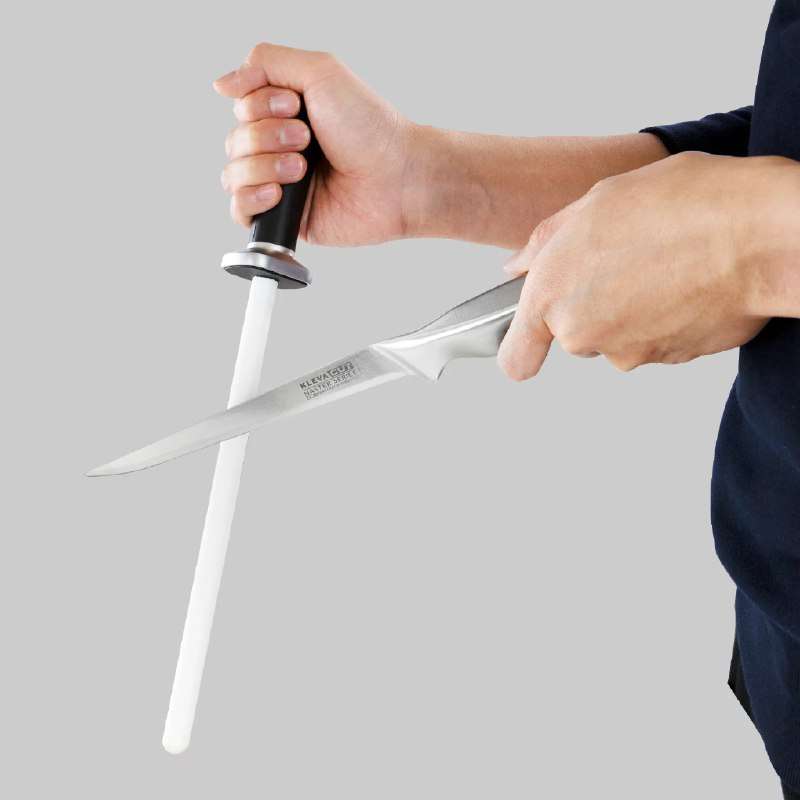
- Proper grip and posture:
Ensure safety and control by gripping the handle of the sharpening rod with your dominant hand and holding the knife with the other. Stand firmly and maintain an upright stance to have a steady base.
- Setting the correct angle:
Align the knife blade at an approximate 15-20 degree angle to the rod. This angle is crucial as it dictates the edge’s sharpness and overall cutting performance.
Executing The Sharpening Motion
Sharpening a kitchen knife with a rod involves a specific motion that requires attention to detail. Glide the knife’s blade down the length of the rod in a sweeping motion, ensuring the entire edge, from base to tip, makes contact with the rod.
Alternate sides with every stroke and continue the process, using light pressure, for about five to ten times per side. The goal is to achieve an even sharpness throughout the edge without applying excessive force which could damage the blade.
Finishing Touches
Once you’ve completed the sharpening routine, it’s imperative to test the knife’s sharpness. You can do this by slicing through paper or making fine cuts on a vegetable. If the blade cuts cleanly and effortlessly, you have successfully honed your knife.
Remember that regular maintenance with a sharpening rod can vastly extend the lifespan of your kitchen knives and ensure they remain functional and efficient for your culinary needs.
Ii. Selecting The Right Rod
Selecting a suitable sharpening rod is crucial for maintaining your kitchen knives’ edge. Ensure it’s made of a material hard enough to realign your knife, like ceramic or diamond-coated steel.
Types Of Sharpening Rods
Before you start the sharpening process, it’s vital to pick the appropriate type of rod for your knife. The material and grit are essential factors that determine how finely your knife is sharpened:
- Steel Rods: These traditional rods are excellent for honing knives that are slightly dull or for quick touch-ups before use. Steel rods realign the edges of the blade to maintain its sharpness.
- Ceramic Rods: Known for their harder surface, ceramic rods can both sharpen and hone the blade, giving it a polished edge. Ideal for sharpening slightly blunter knives.
- Diamond-coated Rods: The hardest type available, diamond rods remove more material from the blade, making them perfect for restoring the sharpness of very dull knives.
Knowing Your Rod’s Grit
The grit of the sharpening rod plays a crucial role in the final edge of your kitchen knife. Grit levels can vary, and understanding them is key to achieving a razor-sharp blade:
- Coarse Grit (Lower than 800): Choose a rod with coarse grit if you’re dealing with a very dull or damaged knife. It rapidly sharpens the edge but might leave it slightly rough.
- Medium Grit (800-1500): A rod with medium grit is versatile, suitable for sharpening knives that are not excessively dull but still need a good amount of sharpening.
- Fine Grit (Higher than 1500): When your knife already has an acceptable edge and you’re looking to perfect it, a rod with fine grit is your best option. It smoothens and polishes the blade for precision cutting.
Utilizing the right sharpening rod is just the first step toward ensuring your kitchen knives are perfectly honed and ready for any task. Be sure to pair your chosen rod with the appropriate technique for the best results.
A. Understanding Rod Materials
Selecting the right rod material is crucial for effectively sharpening your kitchen knives. Ceramic and steel rods are popular choices, each offering unique benefits to maintain a sharp, precise cutting edge.
Keeping your kitchen knives razor-sharp is essential for efficient and safe food preparation. One of the most trusted tools for this task is the sharpening rod, often called a honing steel. Understanding the different materials from which these rods are made can help you choose the best one for your knives and ensure they retain their cutting edge for longer.
Ceramic Rods
Ceramic rods are favored for their fine abrasive surface, which polishes the knife as it sharpens. They’re usually composed of aluminum oxide, which is hard enough to straighten out the microscopic teeth on a blade’s edge without removing too much metal.
Here’s what makes ceramic rods a preferred choice:
- Durability: Ceramic is hard and wear-resistant, promising a long service life with proper care.
- Fine Honing Ability: The smooth surface is perfect for regular honing right before food prep.
- Delicate Touch: Ideal for knives with a harder steel, as they refine the edge without being overly harsh.
Steel Rods
When people envision a classic sharpening rod, they often picture the steel version. These rods have the strength needed to realign the edge of your knife quickly. They are the workhorses of sharpening tools, and here’s why:
- Aggressive Realigning: Steel rods can realign a knife’s edge faster due to their coarse nature.
- Magnetized Surface: This feature helps to capture metal filings that come off the knife during the sharpening process.
- Heat-Treated Construction: Many steel rods undergo a heat-treating process to increase their hardness and effectiveness against the knife’s edge.
Selecting the right material for your sharpening rod is not just about achieving a sharp edge but also about maintaining the quality of your knives over time. Whether you opt for a ceramic or steel rod, the correct technique and a little routine maintenance will keep your kitchen knives performing at their best.
B. Choosing The Correct Length And Grit
Selecting the appropriate rod length and grit is crucial for optimal sharpening. Longer rods suit large knives; finer grits refine the edge.
A sharp kitchen knife is not just a chef’s pride; it’s a key tool that makes meal prep safer and more efficient. When it comes to honing that edge, using the right honing rod is critical. Length and grit are the cornerstones of a good sharpening session.
Let’s get into why these factors are pivotal and how to select the perfect combination for your knives.
The Importance Of Rod Length
Understanding the significance of the honing rod’s length is essential for effective knife maintenance:
- Match the knife size: Choose a rod that is at least as long as the longest knife you plan to sharpen. This ensures the entire blade can be swept across the rod in a single stroke.
- Control and stability: A longer rod offers more surface area to work with, providing greater control and stability during the sharpening process.
Grit Varieties And Their Uses
Different types of grit on honing rods have unique purposes. Here’s what you need to know:
- Coarse grit: This rougher surface removes more metal and is beneficial for knives that are particularly dull or have small nicks and chips.
- Fine grit: A smoother option for refining and polishing the knife’s edge, perfect for regular maintenance to keep a good edge on your knives.
By considering the length and grit of your honing rod, you’re setting yourself up for success every time you pull your knives out. It’s the detail-oriented choices that elevate a simple kitchen task into a culinary art. Keep your knives in top condition, and they’ll return the favor with precise and effortless cuts.
Iii. Preparing The Knife
Preparing your knife demands precise technique and a honing rod. Hold the rod firmly and glide the blade along its length at a 20-degree angle for optimal sharpness.
Keep your kitchen knives cutting with precision and ease by mastering the art of sharpening. A well-honed blade makes food preparation safer and more enjoyable. Before we dive into the actual sharpening process with a honing rod, it’s crucial to prepare your knife properly.
Correct preparation is the key to achieving that razor-sharp edge without damaging your cherished kitchen tool.
Check Knife For Damages
Begin by closely inspecting your knife for any nicks, chips, or defects. A blade in good condition is essential for successful sharpening.
- Blade Inspection: Ensure the knife’s edge is free from significant damage which could impede the sharpening process.
- Handle Integrity: Confirm that the handle is secure and has no cracks or looseness that may affect grip during sharpening.
Clean Your Knife
Before sharpening, a clean knife is paramount to avoid introducing any debris on the honing rod.
- Make sure to thoroughly wash your knife with warm soapy water.
- Dry it completely with a soft towel to prevent any rust formation.
Secure The Knife
Safety should be your top priority while preparing to sharpen your kitchen knife.
- Grip: Hold the handle firmly to maintain control throughout the preparation process.
- Stability: Place the knife on a stable surface if additional inspection or cleaning is needed to avoid any slippage.
Positioning For Sharpening
Proper blade positioning relative to the honing rod will ensure the sharpening process is effective and doesn’t damage the knife or the rod.
- Hold the knife at approximately a 20-degree angle to the honing rod.
- This angle is typically suitable for most Western-style kitchen knives aiming for an efficient edge without compromising the blade’s durability.
Honing Rod Inspection
Just as the knife needs to be ready, the honing rod itself should be in prime condition for sharpening.
- Surface Check: Inspect the honing rod for any wear or uneven surfaces that could impair its performance.
- Cleanliness: Ensure that the rod is clean, as built-up residue can decrease its sharpening capability.
The preparation of your knife is a fundamental step in achieving that coveted sharpness. By paying close attention to each of these aspects, you’re setting yourself up for a successful and satisfying sharpening experience. Savor the process, and you’ll soon be slicing and dicing with remarkable ease and precision.
A. Cleaning And Drying The Blade
Maintaining your kitchen knife’s sharpness begins with a clean, dry blade. Before honing, ensure any residue is thoroughly wiped off to prevent slipping and achieve the best edge.
Cleaning And Drying The Blade
Before you begin the sharpening process, it’s paramount to start with a clean, dry blade. Ensuring that your knife is free of any residue, oils, or bits of food not only makes the sharpening routine safer but also more effective.
A clean surface allows the sharpening rod to make proper contact with the edge of the blade, yielding superior results. Here’s how to get your knife ready:
- Wash the knife: Use warm soapy water to carefully clean the blade. Use a sponge or a soft cloth to gently scrub any debris off the knife. Avoid harsh scrubbing pads that can scratch the blade’s surface.
- Rinse thoroughly: After washing, be sure to rinse the knife under clean running water to remove all soap traces, which can affect the taste of your food and cause additional friction during sharpening.
- Dry immediately: Use a clean towel to pat the blade dry. Ensure no moisture remains on the blade, as water can lead to rust formation and potentially compromise the knife’s integrity.
Remember, starting with a clean and thoroughly dried knife is not just for hygiene; it’s a critical step that affects the outcome of your sharpening.
B. Ensuring Safety Measures
Before honing your kitchen knife with a rod, prioritize safety measures to prevent accidents. Ensure the work area is stable and secure the rod to avoid slippage while sharpening the blade.
Ensuring Safety Measures
Before we dive into the nitty-gritty of sharpening blades, prioritizing your safety is paramount. Handling sharp objects, after all, requires respect and careful attention. Let me walk you through some key safety measures to take before you even pick up that honing rod.
Wear Appropriate Protective Gear
- Cut-resistant gloves: Invest in a pair of cut-resistant gloves. These are designed to guard your hands against accidental slips during the sharpening process.
- Non-slip mat: Place a non-slip mat beneath your cutting board or sharpening station. This provides stability, ensuring the surface won’t move unexpectedly.
Clear And Prepare The Workspace
A clutter-free environment is essential for safe knife sharpening. This is the method to arrange your working area:
- Remove unnecessary items: Clear the counter of any objects that could interfere with the sharpening movements or pose a hazard.
- Ensure good lighting: Proper illumination helps you keep a close watch on the honing rod and knife angle.
Secure The Knife Before Sharpening
Securing the knife is a step that cannot be skipped:
- Hold the knife handle firmly: Grip the knife handle with confidence to maintain control at all times.
- Keep fingers away from the blade edge: Position your fingers on the spine of the blade or handle to avoid accidental cuts.
Focus On Technique, Not Speed
Having patience is a valuable attribute, particularly when it comes to sharpening knives:
- Slow and steady movements: Rushing can lead to mistakes. Take your time with each stroke on the honing rod.
- Consistent angle: Maintaining a consistent angle between the knife and rod is crucial for an even edge.
By adhering to these safety tips, you can sharpen your kitchen knife effectively while minimizing risks. Remember, a sharp knife is a safe knife, but only if used with proper care and precautions.
Iv. Sharpening Process
Mastering the sharpening process is crucial for maintaining your kitchen knife’s edge. Gripping the knife at a 20-degree angle against the rod, slide it confidently and evenly to ensure a finely honed blade.
Maintaining a razor-sharp edge on your kitchen knives not only ensures precision in your culinary creations but also enhances safety during food preparations. Let’s dive into the step-by-step process of honing your blades to perfection with a rod.
Preparing The Sharpening Rod And Knife
Before initiating the sharpening routine, it’s essential to prepare your tools. A smooth and clean rod will interact effectively with the knife’s edge, while ensuring the knife is free from any debris will greatly aid in achieving a sharp edge.
Here are key preparatory steps:
- Cleaning the rod: Wipe down the sharpening rod with a damp cloth to remove any dust or particles.
- Inspecting the knife: Check the blade for nicks and food remnants, cleaning it appropriately.
Positioning And Angle Setup
Getting the angle right is crucial for a successful sharpening session. A consistent angle between the knife and the rod results in an evenly honed edge, ultimately leading to more precise cuts. Here’s how you can ensure proper positioning:
- Holding the rod firmly: Grasp the handle securely to prevent the rod from slipping.
- Blade angle: Aim for a 15-20 degree angle between the knife and the rod which is optimal for most kitchen knives.
The Sharpening Strokes
Sharpening your knife involves a series of deliberate strokes against the rod, each one contributing to the increasingly sharp edge. Each pass should be performed with care to maintain consistency across the blade’s length. Here’s what to take into account:
- Stroke control: Apply moderate pressure as you glide the blade from the base to the tip across the rod.
- Number of strokes: Repeat the process 8-10 times on each side of the blade to evenly sharpen the edge.
Regular Maintenance
After you’ve achieved a sharp edge, regular maintenance of your knife ensures longevity and ongoing cutting precision. Here’s how to keep your blade in top condition:
- Daily honing: Briefly run the knife along the rod before each use to align the edge.
- Proper storage: Keep knives in a wooden block or on a magnetic strip away from other utensils.
Clean Up And Care
Post-sharpening steps are just as important as the actual sharpening process to preserve both the rod and your knife. Consider the following:
- Wiping down the knife: Use a clean, damp cloth to remove any metal filings from the blade.
- Storing the rod: Place the rod in a secured spot where it won’t be damaged or cause harm.
By following these steps diligently, you not only maintain your kitchen knives’ sharpness but also extend their life span, making each culinary task more enjoyable and efficient. Keep this guide close, and you’ll master the art of knife sharpening with a rod in no time.
A. Holding The Knife And Rod Correctly
Ensuring a secure grip on the knife with your dominant hand and holding the sharpening rod firmly with the other is crucial for effective honing. Proper alignment matters, as maintaining a consistent angle between the blade and the rod leads to a sharp, efficient cutting edge.
Holding The Knife And Rod Correctly
Sharpening your kitchen knife with a rod, often referred to as honing, is a vital skill that ensures your knives remain in top-notch condition for precise and safe cutting. Let’s start by mastering the correct way to hold both the knife and the sharpening rod.
- Grip the Handle Firmly:
Hold the knife by the handle, making sure that your grip is firm but comfortable. This will give you better control and stability when sharpening.
- Position of the Rod:
Your other hand should hold the sharpening rod upright and steady. The tip of the rod should be rested on a non-slip surface to avoid any movement or accidents.
- Knife Angle:
Aim to maintain an angle of about 15-20 degrees between the knife blade and the rod. This angle is ideal for most kitchen knives and ensures an efficient sharpening process.
- Safety First:
Always keep your fingers away from the blade’s edge to avoid cuts. Use the handle of the sharpening rod for grip, not the shaft, to keep your hand safe.
The Proper Sharpening Technique
Once you’ve got the hold right, the sharpening technique becomes crucial. A well-honed knife is a chef’s best friend, gliding effortlessly through ingredients. Consistency and patience are key here.
- Starting at the Base:
Begin by placing the heel of the knife (the part closest to the handle) at the top of the rod near its handle.
- Smooth Motion:
Gently slide the blade down the rod in a sweeping motion as if you’re trying to slice a thin layer off the rod. Do this all the way to the tip of the knife.
- Even Pressure:
Apply consistent, moderate pressure throughout the stroke. This ensures the entire length of the blade is evenly sharpened.
- Repeat on Both Sides:
After several strokes on one side of the blade, switch to the other side and repeat the process to maintain balance in the sharpening.
By holding the knife and rod correctly and following the proper sharpening technique, you can ensure your kitchen knives are always prepared for the task at hand. Remember that practice makes perfect, and with time, you’ll hone not just your knives but also your sharpening skills.
B. Executing The Sharpening Strokes
Master the art of honing your kitchen knives with a sharpening rod by using smooth, angled strokes. Gently guide the blade down the rod, maintaining consistent pressure to ensure a sharp, even edge.
Sharpening your kitchen knife with a rod isn’t as daunting as it might sound. With a bit of patience and the right technique, you can give your knife that razor-sharp edge it had when you first brought it home. Let’s dive into the steps you’ll need to take to execute those perfect sharpening strokes.
Preparing Your Sharpening Rod
Before you start the sharpening process, it’s essential to get your rod ready:
- Select the right angle: The angle you hold the sharpening rod at is crucial. For most kitchen knives, an angle of 20 degrees is ideal.
- Secure your rod: Ensure the handle is firmly gripped and the tip is placed on a non-slip surface to keep it steady.
- Clean the rod: Wipe down the rod with a damp cloth to remove any debris, ensuring a smooth run for the knife’s blade.
Executing The Sharpening Strokes
Now, for the main event: running your knife along the rod to sharpen it. Follow these steps closely:
- Hold the knife correctly: Grip the handle of the knife with your dominant hand and place your other hand on the flat side of the blade for control.
- Maintain consistent pressure: Apply moderate pressure as you slide the knife down the rod, ensuring you don’t press too hard or too lightly.
- Glide from heel to tip: Start with the heel of the blade against the top of the rod. As you move the knife downwards, simultaneously pull it back, so the whole length of the edge, down to the tip, contacts the rod.
- Repeat the process: Do the same number of strokes on each side to maintain an even edge. Usually, 10-15 strokes per side are sufficient.
Remember, maintaining the correct angle and consistent pressure are keys to achieving that desired sharpness. Practice will make perfect, so take your time and be patient as you refine your technique. A well-sharpened knife is not just a joy to use but also ensures safety in the kitchen.
Happy sharpening!
C. Determining When The Knife Is Sharp
Knowing when your knife has achieved peak sharpness is key. Test its edge by slicing through paper or feeling the blade’s resistance.
Determining When The Knife Is Sharp
Sharpening a kitchen knife with a rod is an essential skill for any culinary enthusiast, but the real trick lies in knowing when to stop. A perfectly sharpened knife can greatly enhance the cooking experience, making food preparation easier and more precise.
As you glide the knife across the sharpening rod, there comes a moment of truth—the point at which the knife has reached its optimal sharpness. How do you recognize this pivotal moment?
The Thumb Test
- Visual Inspection: Check for a reflective edge
- When the edge of the knife starts reflecting light, it’s a sign that the blade is getting smooth and even. This is usually an indicator of sharpness, as a dull blade would scatter light rather than reflect it.
- The Thumb Test (Tactile): Gently slide your thumb across (not along) the edge
- Carefully feeling the edge with your thumb pad, a sharp knife will give a sensation of a biting edge without pressing hard. It’s important to exercise caution during this test to avoid any injury.
The Paper Slice
After conducting the thumb test, it’s wise to move on to a practical demonstration of your knife’s sharpness.
The Paper Slice (practical Test):
- Consistency: Slice a piece of paper without tearing
- A sharp knife should cut through paper smoothly and consistently. If the blade catches or tears the paper, it still needs some work.
- Sound: Listen to the sound of the cut
- The sound of the knife cutting through the paper should be even and steady. A sharp knife typically produces a clean, crisp sound, while a dull knife would create a more ragged noise.
Throughout the sharpening process, it’s important to keep these tests in mind. Not only do they help you identify the perfect moment to stop sharpening, but they also ensure that your knife is ready for any task in the kitchen.
With practice and attention to detail, you’ll soon develop a sharpening routine that gets your knives slicing effortlessly every time. Remember to handle all cutlery with care, respect, and a sense of pride in your craftsmanship.
V. Care And Maintenance
Proper care extends the life of your kitchen knives, ensuring they remain sharp and efficient. By mastering the art of sharpening with a rod, you give your blades precision edges for superior cutting performance. Regular maintenance with this technique keeps them in top condition.
Keeping your kitchen knives razor-sharp not only makes your food prep work easier but also safer, preventing dangerous slips caused by dull blades. With regular use, even the highest quality knives will start to lose their edge and that’s where honing with a rod comes in.
Maintaining and caring for your sharpening rod will ensure it’s always ready to restore the edge of your favorite chef’s knife.
After Each Use:
After honing your kitchen knife, it’s crucial to take care of the sharpening rod itself to keep it in optimal condition. A simple yet effective routine will extend its life and maintain its efficacy.
- Clean the rod with a damp cloth: Remove any metal filings that might have adhered to the rod during the honing process.
- Dry it thoroughly: To prevent rust and other forms of corrosion, make sure the rod is completely dry before storing.
- Inspect the rod for wear: Regularly check for any signs of damage or excessive wear that could render the rod less effective.
Storage Solutions:
How and where you store your sharpening rod can significantly affect its longevity and performance. Proper storage is necessary to avoid accidental damage.
- Separate from other utensils: Store your sharpening rod in a dedicated space, away from knives and other cooking tools to prevent it from being knocked around.
- Keep it vertical or horizontally supported: Position it upright in a container or lay it horizontal on a padded rack to maintain its shape and integrity.
- Avoid humid environments: A dry storage location will prevent the metal from deteriorating due to moisture.
Maintaining your sharpening rod shouldn’t be an afterthought. By ensuring it receives the proper care after each use and is stored correctly, you’re not only investing in the tool itself but also in the quality of your knives’ performance. Regular maintenance is key to making meal prep both enjoyable and efficient, guaranteeing that a perfectly honed edge is always within reach.
A. Cleaning The Rod
Before honing your knife, ensure the rod is clean and debris-free. Gently wiping it down with a damp cloth will remove any particles that could impede the sharpening process.
Cleaning The Rod
Sharpening a kitchen knife requires not just technique and skill but also a properly maintained honing rod. Before beginning the sharpening process, it’s essential to clean your rod thoroughly to ensure the best outcome for your knife’s edge.
- Inspect the rod for debris: Look over the honing rod closely to identify any metal filings or residues that may have accumulated from previous use. These can interfere with your sharpening effectiveness.
- Use soapy water: Gently clean the rod with warm soapy water to remove any build-up or grease. This step is crucial for maintaining the friction that is necessary for a successful sharpening motion.
- Rinse and dry immediately: After washing, rinse the rod under clean water and promptly dry it with a soft, absorbent towel to prevent rusting or water spots, which could damage the delicate surface over time.
- Sanitize if necessary: If dealing with a stainless steel rod, consider using a mild disinfectant to sanitize the tool, particularly if it will come into contact with food items or if it hasn’t been used in a while.
Storing The Rod Safely
Once the honing rod is sparkly clean, proper storage is vital to preserve its integrity and prolong its life. Let’s look into the best practices for storing your sharpening tool.
Positioning the honing rod correctly is as significant as having a clean one. Proper storage ensures the rod’s surface remains free of scratches and ready for its next use, which in turn keeps your kitchen knives in top-notch condition. Here’s how to store your rod wisely:
- Find a dedicated space: Set aside a specific area in your kitchen or tool storage where the honing rod can stay protected. Avoid tossing it into a crowded drawer where it could get knocked around and damaged.
- Consider a protective sleeve: Many honing rods come with a protective sleeve or case. Always return the rod to this protection after cleaning and drying to keep it in prime condition.
- Hang it up: Some honing rods are designed with a loop or a handle that allows for hanging. Hanging your rod is an effective way to prevent contact with other kitchen tools, which might chip or dull its surface.
- Keep away from moisture: Store the rod in a dry place to discourage the formation of rust, ensuring its longevity and functional sharpness for consistently honed knives.
B. Storing The Rod And Knife Properly
Ensure the longevity of your sharpening rod and knife by storing them correctly. Designate a dry, safe spot away from moisture and potential hazards for storage after each use. Proper placement protects the edges and surfaces, maintaining sharpening efficiency and knife performance.
A sharp kitchen knife isn’t just a culinary essential; it’s a safety tool. But sharpness can be fleeting without proper care, and that includes adequate storage of both your honing rod and knives. Here’s how to keep them in top-notch condition.
Choosing The Right Spot For Your Honing Rod
Selecting an appropriate place for your honing rod ensures longevity and safekeeping. Consider these factors:
- Accessibility: Position your rod where it’s easy to reach, facilitating regular maintenance of knives.
- Safety: A secure spot prevents the rod from falling, which could cause damage or injury.
- Environment: Avoid areas prone to dampness that could cause corrosion or handle deterioration.
Keeping Your Knives Sharp And Secure
Storing knives correctly is crucial for maintaining their edge and ensuring safety. Here’s what you should do:
- Use a knife block: A wooden or plastic block keeps blades separated and sharp.
- Magnetic strips: These save space and provide easy access, but ensure they’re mounted firmly.
- Drawer inserts: Keeping knives in a drawer? Use an insert to prevent them from moving and dulling.
Vi. Conclusion
Mastering the art of sharpening your kitchen knife with a rod ensures peak performance during meal prep. Embrace this skill to slice effortlessly, enhancing your culinary experience.
Mastering The Honing Steel
Ever found your kitchen knife dragging through tomatoes rather than slicing cleanly? A dull blade could be the culprit, and that’s where honing with a steel rod can make a world of difference. Regular honing realigns a knife’s edge, keeping it sharp and ready for action.
A Step-by-step Guide To Honing
Before we delve into the simplicity of the honing process, it’s key to grasp that precision and consistency are your true companions here:
- Proper Angle: Aim for an angle of roughly 15-20 degrees between the knife and the rod. This ensures the fine-tuning of the edge rather than grinding it down.
- Light Pressure: Employ only moderate pressure, as if you’re trying to slice a thin layer off the rod. Heavy-handedness isn’t necessary and can damage the knife.
- Consistent Strokes: Glide the knife down the rod in a sweeping motion, alternating sides to maintain an even edge. Each side should get equal treatment for balance.
- Safety First: Always keep your fingers away from the blade’s path. A stable surface and attentive handling prevent mishaps.
Keeping Your Knives In Top Shape
Enhancing your honing skills goes hand in hand with understanding knife care. Regular maintenance using a steel rod preserves the blade’s edge and prolongs the life of your kitchen cutlery. No fancy equipment needed, just the honing rod and a careful, knowledgeable approach.
Remember to clean the rod with a damp cloth afterward to keep it in prime condition.
Sharpening Vs. Honing: Know The Difference
It’s crucial to recognize that honing is not the same as sharpening. Honing re-edges your blade without removing significant metal. Sharpening, on the other hand, is a process that grinds away metal to create a new edge. It’s needed less frequently but is equally valuable in the kitchen toolkit domain.
Regular honing delays the need for sharpening, which means less wear and tear on your beloved knives.
Embrace The Honing Habit
Incorporating honing into your kitchen routine stands as a testament to your dedication to the culinary arts. A well-maintained knife is a joy to use and elevates your food preparation to a professional standard. Whether you’re a home cook or a chef, the simple act of honing can affect the quality of your work profoundly.
By adhering to these tips and nurturing your honing technique, your knives will remain loyal kitchen companions, always ready for the next culinary adventure. Remember, every slice is a reflection of the care invested in your tools. Keep your blades at their best, and every chop, dice, and julienne will be a cut above the rest.

A. Recap Of Key Points
Mastering the art of knife sharpening ensures peak kitchen performance. Our essential guide on using a honing rod effectively highlights key steps for maintaining a razor-sharp edge on your culinary tools.
Guide To Choosing The Right Sharpening Rod
When aiming for the perfect edge on your kitchen knife, selecting an appropriate sharpening rod is the first crucial step. Not all sharpening rods are created equal, and using the correct type can make a significant difference in the performance of your knife.
Preparing Your Knife And Sharpening Rod
Before you begin the sharpening process, it’s essential to prepare both your knife and rod adequately. This includes cleaning the knife, ensuring that the rod is in good condition, and setting up your workspace for safety and efficiency. Without proper preparation, you could risk damaging your knife or injuring yourself.
Holding The Sharpening Rod Correctly
- Grip firmly: Make sure to hold the handle of the sharpening rod with a secure grip to prevent slipping.
- Angle of the rod: Maintain the rod at an angle that’s conducive to the blade’s existing bevel, usually around 15 to 20 degrees.
Proper Sharpening Technique
Effective use of the sharpening rod involves a specific technique that, once mastered, can be easily repeated for consistent results. Using the right motion and pressure, you will glide the knife’s blade along the rod to restore its sharpness. Consistent strokes at the correct angle are key to achieving a razor-sharp edge.
Cleaning After Sharpening
After you’ve sharpened your knife, it’s imperative to clean both the knife and the rod. This not only keeps your tools in top condition but also ensures there are no metal filings or residue that might contaminate your food.
Maintaining Your Sharpening Rod
- Storing properly: Ensure your sharpening rod is stored in a safe, dry place to avoid any corrosion or damage.
- Regular inspection: Regularly check for any wear or defects that might affect its performance.
By recapping these key points, you now have a comprehensive understanding of how to maintain the razor-sharp edge of your kitchen knives using a sharpening rod. Remember that the quality of your equipment and your attention to technique are what will set you apart as a sharpening aficionado.
Keep practicing, stay patient, and treat your knives and tools with the care they deserve.
B. Emphasizing Regular Maintenance For Sharp Knives
Maintaining a sharp edge on your kitchen knives ensures precision cutting and culinary efficiency. Regular use of a honing rod can keep blades at peak performance, simplifying the task and enhancing safety in the kitchen.
Sharpening your kitchen knife with a rod is crucial for keeping your meal prep efficient and safe. Dull knives are more likely to slip and can make chopping a struggle. But more than just knowing how to sharpen your knife, it’s vital to maintain the knife’s edge regularly.
Let’s delve into how regular maintenance can make a world of difference for your kitchen cutlery.
The Significance Of Daily Honing
Before you use your knife, take a moment to hone it with a rod. This practice aligns the edge of the blade, ensuring precision and ease with every slice:
- Realigns the Blade: The honing rod corrects the edge without removing significant amounts of metal.
- Reduces Wear: Regular honing cuts down on the need for more abrasive sharpening, which can wear down your knife.
- Ensures Consistency: A well-maintained edge provides consistent cutting results, critical for cooking tasks that demand precision.
Sharpening Vs. Honing: Clarity In Maintenance
It’s easy to mix up the concepts of sharpening and honing, but understanding the difference is key to knife care:
While sharpening removes metal to create a new edge, honing simply straightens the existing edge. Honing should be done frequently – even after each use – to maintain a sharp edge, whereas sharpening is a less frequent necessity.
The Right Technique For Using A Honing Rod
Proper technique will maximize the rod’s effectiveness and keep your knives in top shape, so here’s a rundown on how to do it right:
- Hold the Rod Firmly: Grip the handle of the rod tightly and hold it at a 15-20 degree angle away from you.
- Steady Angles for Success: Maintaining the correct angle is crucial; a consistent angle throughout the stroke ensures an even edge.
- Gentle Strokes Win the Race: Use gentle pressure as you glide the knife down the rod. Excess force isn’t necessary and can do more harm than good.
A Habit That Pays Off
Incorporating knife maintenance into your daily routine is a small habit that yields big benefits:
By taking just a few moments to hone your knives regularly, you’re investing in their longevity and your culinary success. A sharp knife is a chef’s best friend, preventing kitchen accidents and making cooking a more enjoyable experience. Whether you’re a seasoned chef or a home cook, make honing a non-negotiable part of your kitchen habits.
Frequently Asked Questions On How To Sharpen Kitchen Knife With Rod
What Is A Honing Rod Used For?
A honing rod, or sharpening steel, realigns the edge of a knife blade. It maintains the knife’s sharpness by straightening the micro-edge.
Can You Sharpen A Knife With Any Rod?
No, not all rods sharpen knives. Only rods designed for honing or made of materials harder than the knife steel can sharpen a blade effectively.
How Often Should I Hone My Kitchen Knife?
Hone your kitchen knife regularly, ideally every 2-4 times you use it. This keeps the blade in top condition and prolongs sharpness.
What Angle Do I Use To Sharpen A Knife?
Maintain a 15-20 degree angle between the knife and rod for effective sharpening. This angle is optimal for most kitchen knives.
Conclusion
Sharpening a kitchen knife with a rod is essential for precision cutting. Mastering this technique not only boosts safety but also enhances your culinary experience. With the steps outlined above, you’ll maintain sharp blades effortlessly. Don’t forget regular maintenance for long-lasting edge retention.
Happy chopping!