

Best Way To Install Kitchen Sink Clips?
The best way to install kitchen sink clips is, first position your sink and then secure the clips underneath. Tighten each clip with a screwdriver to hold the sink firmly in place.
Installing kitchen sink clips is an essential step in ensuring your kitchen sink remains securely attached to the countertop. A firm installation prevents leaks and maintains the sink’s stability when you pile dishes or apply pressure during use. Understanding the right approach to installing these clips not only saves you time but also spares you from future maintenance issues that can arise from an improperly fitted sink.
The process involves crucial steps like proper positioning, even distribution of clips, and applying the right amount of torque. The goal is to achieve a balance between a secure fit and not over-tightening, which could damage the sink or countertop. With the exact methodology and the right tools, installing kitchen sink clips is a straightforward DIY task that enhances the functionality and longevity of your kitchen sink.
Prerequisites And Tools Needed
Installing a kitchen sink is an essential step in any kitchen renovation. Before starting, it’s crucial to have everything you’ll need at hand. This ensures a smooth and efficient installation process. Let’s dive into the prerequisites and tools needed to install kitchen sink clips effectively.
Identifying The Right Sink Clips
Choosing the correct sink clips is the first step. Not all clips fit every sink or countertop. Measure your sink’s thickness and the countertop’s underside to guarantee a perfect match.
Match the clip design to your sink’s brand and model. Some clips are screw-on types, while others may snap into place. Ensure you know the clip type your sink requires.
Gathering Essential Tools
Having the right tools at your fingertips is key for a successful installation. You’ll need a mix of common and specific tools.
- Screwdriver – for tightening the sink clips
- Adjustable Wrench – to adjust clips if necessary
- Sealant Gun – for applying the caulk around the sink
- Silicone Caulk – to create a watertight seal
- Flashlight or work light – to see under the counter
- Gloves – to protect your hands
- Safety Glasses – to protect your eyes
Make sure batteries are fully charged for any cordless tools. Keep a cloth handy for any spills or to clean excess caulk.
Preparation Steps
Before diving into the mechanics of installing kitchen sink clips, proper preparation ensures a smooth process. Let’s go over the essential steps you’ll need to take to prepare for a successful installation.
Ensuring Sink Compatibility
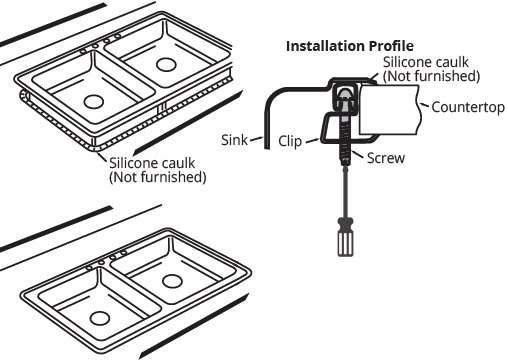
Check the fit before any installation begins. Not all sinks and clips are universal. First, measure your sink’s dimensions. Then, compare these measurements with your countertop’s cutout size. Your sink should have a lip around the edge; this is where the clips will attach. Also, inspect the underside of your sink for pre-drilled holes or indentations designed for clip attachment. These are signs of compatibility.
- Measure sink and countertop cut-out
- Check for lip around the sink’s edge
- Look for pre-drilled holes or clip indentations
Cleaning The Installation Area
With compatibility confirmed, it’s time for a clean workspace. Dust, debris, or old sealant remnants can prevent your new sink from seating correctly and compromise the seal. Begin with a dry cloth to remove any loose particles. Next, use a degreaser or soap and water to thoroughly clean the surface. Finish by drying the area completely to prepare for the clip installation.
- Remove loose particles with a dry cloth
- Clean surface with degreaser or soapy water
- Dry area completely before continuing
Setting Up The Clips
Setting up the clips for your kitchen sink is crucial for a stable and secure installation. These small but mighty components keep the sink in place. Let’s dive into the straightforward process!
Positioning The Sink
Before attaching any clips, ensure the sink fits snugly into the countertop. Ensure proper alignment with the opening. A perfect fit is key for an easy installation.
Attaching The Clips
Attaching the clips anchors the sink effectively. Follow these steps:
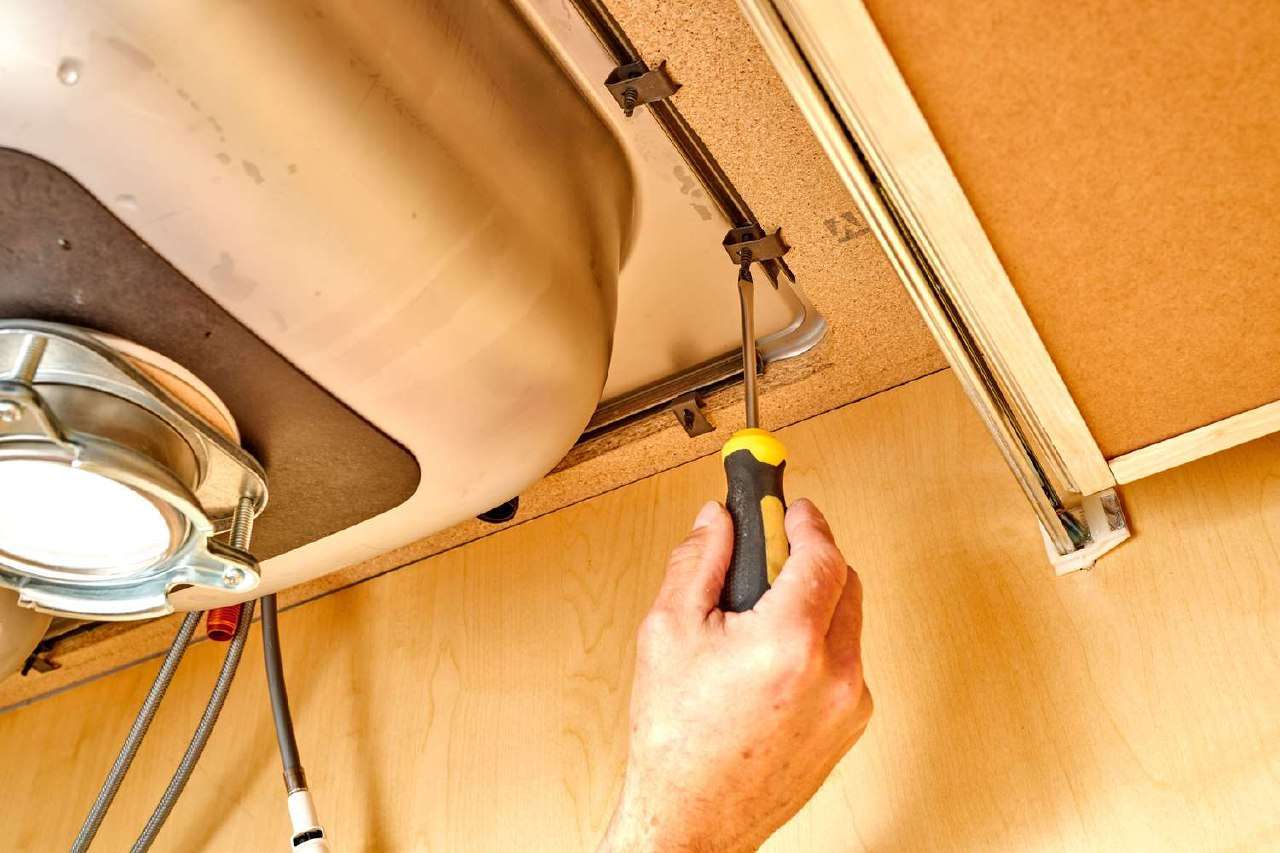
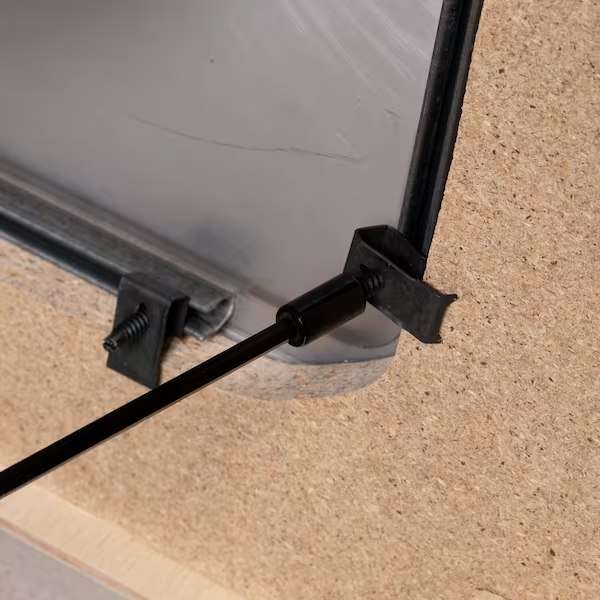
- Flip the sink over to access the underside.
- Locate the clip attachment areas. These are usually marked or pre-drilled.
- Attach each clip loosely, so there’s room for adjustments.
Once in place, evenly distribute and tighten the clips firmly. This secures the sink to the countertop, ensuring stability for years to come.
Securing The Sink
After placing your new kitchen sink into the countertop hole, it’s time to make sure it doesn’t move. Securing the sink is crucial for avoiding leaks and keeping the sink steady for daily use. This process involves tightening sink clips and ensuring the sink is stable. Let’s get started so your sink stays put and performs perfectly.
Tightening The Clips
- Locate the clips: Under the sink, find the clips around the edges.
- Align the clips: They should sit flat against both the sink and countertop.
- Hand-tighten: Start by hand-tightening the clips to hold the sink in place.
- Use a screwdriver: Secure the clips completely by tightening with a screwdriver.
- Even pressure: Apply equal pressure while tightening to prevent damage.
- Don’t over-tighten: Avoid stripping the clips by stopping when they are snug.
Checking For Stability
- Gently push: Apply light pressure on the sink to test initial stability.
- Look for movement: There should be no shifting or wobbling.
- Re-tighten if needed: If there’s any give, tighten the clips further.
- Seal check: Ensure the sealant between sink and countertop is intact.
- Final inspection: Do one more push test to confirm the sink is secure.
Finishing Touches
You’ve installed your kitchen sink clips, and it’s time for the final steps. The finishing touches ensure a watertight seal and a clean, professional look. Let’s take those last strides to perfection.
Sealing With Caulk
A strong seal keeps water at bay. Use silicone caulk around the sink edge to achieve this. Follow these bullets for a neat seal:
- Clean the surface around the sink thoroughly.
- Apply caulk evenly around the edge.
- Smooth the caulk with a damp fingertip for a sleek finish.
- Let it dry for 24 hours before using the sink.
Cleanup And Maintenance
After sealing, focus on these tasks:
- Remove any excess caulk or debris.
- Wipe down surfaces with a damp cloth.
Maintain your sink by regularly checking the clips and sealant. Tighten and reseal as necessary. This keeps your sink secure and leak-free.
Regular checks avoid future headaches. Celebrate your completed project with a clean and fully functional sink!
Common Challenges And Solutions
Installing a kitchen sink is not always smooth sailing.
Various challenges can arise during the install.
Common challenges include misalignment or improper tension of clips.
This section addresses these issues with simple solutions.
Dealing With A Misaligned Sink
A misaligned sink can cause leaks and affect your countertop.
Follow these steps to align your sink perfectly:
- Check alignment before securing the clips.
- Loosen clips slightly if the sink is skewed.
- Adjust the sink position as needed.
- Re-tighten the clips once alignment is correct.
Do not force the sink into place.
That could damage both the sink and countertop.
Adjusting Clip Tension
Clip tension secures the sink but should not warp it.
Proper tension ensures a snug fit without damage.
Here is how to adjust it:
- Hand-tighten the clips first.
- Use a screwdriver or wrench for final adjustments.
- Avoid over-tightening to prevent sink damage.
- Check for movement and re-tighten if necessary.
A well-installed sink preserves its integrity over time.
Safety Tips
Before diving into the exciting world of DIY kitchen upgrades like installing sink clips, safety comes first! Small precautions can prevent major mishaps. So, suit up, handle tools with care, and get ready for a safe and straightforward installation process.
Personal Protective Equipment
Personal protective equipment (PPE) is your first line of defense. Here’s what you need:
- Gloves: Choose sturdy ones to protect against sharp edges.
- Safety Goggles: Keep your eyes clear of debris and dust.
- Ear Protection: Use it if you’re working with loud tools.
Safe Handling Of Tools
Tools are your allies, but you must respect them.
- Read Manuals: Always review the tool’s instruction manual first.
- Inspect Tools: Check for damage before use.
- Proper Storage: Keep tools in a secure place to avoid accidents.
Careful handling and PPE are keys to a successful DIY kitchen sink clip installation. Follow these steps, and you’re ready to go!
Frequently Asked Questions Of best way To Install Kitchen Sink Clips?
How Do Sink Clips Go On?
Align sink clips under the countertop. Position the clips against the sink’s rim. Tighten clip screws to secure the sink firmly. Repeat for all clips.
Can You Install A Sink Without Sink Clips?
Yes, you can install a sink without clips by using silicone adhesive or undermount sink brackets. Ensure proper sealing to prevent leaks and maintain stability.
How Do You Secure A Kitchen Sink To A Countertop?
Secure a kitchen sink to a countertop using clips and sealant. Attach clips under the countertop edge, then tighten them against the sink’s rim. Apply a bead of silicone sealant around the sink’s perimeter to ensure a watertight seal. Always follow the manufacturer’s instructions for best results.
Are Sink Clips Necessary For Drop-in Sink?
Sink clips are not essential for a drop-in sink, but they do provide extra stability and help prevent movement. Use them for a secure installation.
Conclusion
Installing sink clips may seem daunting, but with the right tools and some patience, it’s a task you can tackle. Remember to measure accurately, secure the clips firmly, and check for leaks upon completion. Embarking on this DIY project can save you money and leave you with a sense of accomplishment.
We trust this guide has made the process clearer, paving the way for a successful installation!


3 Comments