

To build a kitchen cart, gather the required materials and tools, measure and cut the wood according to the desired dimensions, assemble the cart using screws and other hardware, and add any desired finishing touches such as paint or stain. This versatile mobile cart can provide additional storage and workspace in your kitchen while allowing for easy maneuverability and customization options.
With the right planning and execution, building a kitchen cart can be a rewarding DIY project that enhances the functionality and style of your kitchen. Whether you are an experienced woodworker or a beginner, this guide will walk you through the steps to create a functional and attractive kitchen cart.
Introduction
Get step-by-step instructions on how to build your own kitchen cart from scratch. This DIY project is perfect for adding extra storage and workspace to your kitchen.
When it comes to adding functionality and storage space to your kitchen, building your own kitchen cart can be a rewarding project. By leveraging your DIY skills, you can create a custom kitchen cart to suit your exact needs and style.
Let’s delve into the key aspects to consider before starting this project.
Planning And Design:
- Determine the dimensions of your kitchen cart, keeping in mind the available space and your specific requirements.
- Consider the materials you will use for the cart, such as wood, metal, or a combination of both, ensuring durability and visual appeal.
- Decide on the type of storage features you want to incorporate, whether it’s open shelves, drawers, or a combination of both, to enhance functionality.
Construction And Assembly:
- Begin by cutting the wood or metal components according to your dimensions and design plan.
- Assemble the main structure of the cart, ensuring that it is sturdy and well-balanced.
- Install the chosen storage features, such as shelves and drawers, to organize your kitchen essentials efficiently.
Finishing And Personalization:
- Sand the surface of the cart to achieve a smooth finish, ready for paint or stain application.
- Apply a coat of paint or stain that complements your kitchen decor, adding a personal touch to the cart’s appearance.
- Install any additional accessories, such as hooks or towel racks, to enhance the cart’s usability and visual appeal.
Creating your own kitchen cart allows you to tailor the design to your specific needs and style while gaining the satisfaction of completing a practical and visually appealing DIY project. Whether it’s for additional storage, workspace, or serving convenience, a custom-built kitchen cart can elevate the functionality and aesthetics of your kitchen.
Briefly Introduce The Idea Of Building A Kitchen Cart To Enhance The Functionality Of Your Kitchen Space.
Enhance your kitchen’s functionality with a DIY kitchen cart. Learn how to build a versatile cart to organize your cooking essentials and create more counter space.
Building A Kitchen Cart To Enhance Your Kitchen Space
Are you tired of limited counter space in your kitchen? Building a kitchen cart can be a game-changer! With a kitchen cart, you can create additional workspace, increase storage options, and add a touch of style to your kitchen. This versatile piece of furniture can serve as a mobile island, a serving station, or a portable bar.
Whether you have a small kitchen that lacks counter space or simply want to make your culinary tasks more convenient, a kitchen cart is a practical solution. We will guide you through the process of building your own kitchen cart, tailored to your kitchen’s needs and your personal style.
Planning Your Kitchen Cart Design:
Designing your kitchen cart is an exciting opportunity to get creative and customize the cart to fit your specific needs. Here are some key considerations to keep in mind during the planning phase:
- Size: Determine the dimensions of your kitchen cart based on the available space in your kitchen and your intended use.
- Materials: Choose materials that are durable, easy to clean, and match the aesthetics of your kitchen. Choices encompass a variety of materials such as wood, metal, or a fusion of the two.
- Style: Decide on the overall style of your kitchen cart, whether it’s modern, rustic, industrial, or something else that complements your kitchen decor.
- Features: Consider the features you want your kitchen cart to have, such as shelves, drawers, hooks for utensils, or wheels for mobility.
- Budget: Determine your budget and find cost-effective options for materials and accessories.
Gathering Materials And Tools:
Before you start building your kitchen cart, gather all the necessary materials and tools to ensure a smooth construction process. Here’s a list of what you will need:
- Wood or metal for the cart’s frame and shelves
- Screws, nails, or brackets for assembly
- Power drill or screwdriver
- Saw or cutting tool to shape the materials
- Use sandpaper or a sanding block for smoothing rough edges
- Measuring tape and ruler for precise measurements
- Pencil or marker for marking cut lines
- Level to ensure your cart is assembled straight and stable
- Optional: Paint, stain, or sealant to finish the cart
Building And Assembling Your Kitchen Cart:
Once you have all the materials and tools ready, it’s time to start building your kitchen cart. Follow these steps to construct and assemble your customized cart:
- Step 1: Measure and cut the frame pieces according to your design, ensuring they are all of the same length and width.
- Step 2: Assemble the frame by attaching the pieces together using screws, nails, or brackets. Use a level to ensure the frame is straight and stable.
- Step 3: Cut and attach the shelves to the frame, making sure they are securely fastened and level.
- Step 4: Sand down any rough edges of the wood or metal to prevent splinters or injuries.
- Step 5: Optionally, apply paint, stain, or sealant to protect and enhance the appearance of your kitchen cart.
- Step 6: Attach any additional features you planned, such as hooks for utensils or wheels for mobility.
- Step 7: Double-check all the connections and make any necessary adjustments to ensure the cart is sturdy and functional.
With your kitchen cart built and assembled, you’re ready to enjoy the benefits of extra workspace and storage in your kitchen. Experiment with different layouts, move it around as needed, and make the most of this versatile addition to your culinary haven.
Say goodbye to cluttered countertops and hello to a more efficient and organized cooking experience!
Highlight The Practicality And Customization Options Of Building Your Own Kitchen Cart.
Discover the practicality and limitless customization options of crafting your own kitchen cart. Design it to perfectly suit your space and style, with convenient storage and functionality. Create a unique and personalized kitchen cart that meets your specific needs and enhances your culinary space.
Building Your Own Kitchen Cart: Practicality And Customization Options
Building your own kitchen cart can be a practical and rewarding DIY project that allows you to tailor the cart to your specific needs and style preferences. Whether you’re looking for extra storage, additional workspace, or a mobile serving station, a homemade kitchen cart offers versatility and functionality.
Here are some reasons why building your own kitchen cart is a great option:
Budget-friendly Solution:
- Save money by building a kitchen cart yourself instead of purchasing a pre-made one.
- Get value for your money by using quality materials that fit your budget.
- Customize the size and features of your cart to avoid paying for unnecessary extras.
Customization Options:
- Personalize your kitchen cart by choosing materials, finishes, and colors that match your existing kitchen decor.
- Adapt the cart’s size, layout, and storage options to fit your specific needs.
- Add unique features such as built-in wine racks, spice racks, or utensil holders.
Tailored Storage Solutions:
- Design your kitchen cart to provide the exact storage solutions you require.
- Include shelves, drawers, or baskets to organize and store your cookware, ingredients, or utensils.
- Utilize vertical space by incorporating hooks or hanging storage for pots, pans, and other kitchen items.
Versatile Workspace:
- Create a movable workspace that can be wheeled into any part of your kitchen or even used in different areas of your home.
- Use the cart’s countertop as an additional area for food preparation, serving guests, or even as a mobile bar for entertaining.
- Enhance functionality by installing a drop-leaf or foldable extension that can be expanded when needed.
Enhanced Mobility:
- Enjoy the convenience of a portable kitchen cart that can be easily moved around as needed.
- Ensure smooth mobility by adding sturdy casters or wheels with lockable features.
- Take advantage of the cart’s versatility by using it for outdoor barbecues, parties, or even as a gardening station.
Sense Of Accomplishment:
- Building your own kitchen cart provides a sense of achievement and pride in your craftsmanship.
- Enjoy the satisfaction of creating a unique and functional piece of furniture tailored to your personal style and requirements.
- Share your DIY project with friends and family, inspiring them to embark on their own creative endeavors.
Now that you’re aware of the practicality and customization options available, it’s time to gather the necessary materials and start building your own kitchen cart. Let your creativity and imagination take charge as you embark on this exciting DIY adventure!
Materials Needed
To build a kitchen cart, you will need materials such as wood boards, screws, casters, and wood glue. These items will help you create a sturdy and movable cart for your kitchen, providing extra storage and workspace.
To build a sturdy and functional kitchen cart, you’ll need the following materials:
- Wooden Boards: Opt for high-quality, strong wood that can withstand the weight and everyday use. Oak, maple, or birch wood are excellent choices.
- Plywood: This will be used for the shelves and the base of the cart. Make sure it is thick enough to provide stability.
- Casters: Choose heavy-duty casters with a locking mechanism to easily move the cart around and keep it in place when necessary.
- Screws: You’ll need various sizes of screws to attach the different components of the cart securely.
- Drill and Drill Bits: A power drill is essential for drilling holes and screwing in the screws.
- Saw: Depending on your design, you may need a circular saw or a miter saw to cut the wood boards to the desired dimensions.
- Measuring Tape: Accurate measurements are crucial for a well-built cart, so make sure to have a measuring tape on hand.
- Sandpaper: Smooth out any rough edges or imperfections with sandpaper. Opt for different grits to achieve a polished finish.
- Wood Glue: Use wood glue to reinforce joints and add extra strength to the cart’s structure.
- Finishing Supplies: Consider using stain, paint, or sealant to protect the wood and enhance its appearance.
- Optional Accessories: Depending on your needs, you can also consider adding hooks, towel racks, or a built-in cutting board to your cart.
By gathering these materials, you’ll have everything you need to start building your own kitchen cart. Remember to measure twice and cut once to ensure precise assembly. Let’s move on to the next section, where we’ll delve into the step-by-step process of constructing the cart.
List And Describe The Necessary Materials And Tools For Constructing A Kitchen Cart, Such As Lumber, Screws, Wheels, And A Drill.
Constructing a kitchen cart requires essential materials and tools, such as lumber, screws, wheels, and a drill. These items are necessary for building a durable and functional cart that can easily be moved around the kitchen.
How To Build A Kitchen Cart
A kitchen cart can be a valuable addition to your kitchen space, providing extra storage and countertop area that can be easily moved around. Building your own kitchen cart can be a rewarding DIY project that allows you to customize the cart to suit your specific needs and style.
Before you embark on this project, it’s important to gather all the necessary materials and tools. In this section, we will provide a detailed list and description of the items you will need.
Materials:
- Lumber: Choose strong and durable lumber for the main frame of your cart. Opt for hardwood, such as oak or maple, to ensure sturdiness.
- Screws: You’ll need screws of various lengths to secure the different components of the cart together. Make sure to choose screws that are suitable for the type of wood you are using.
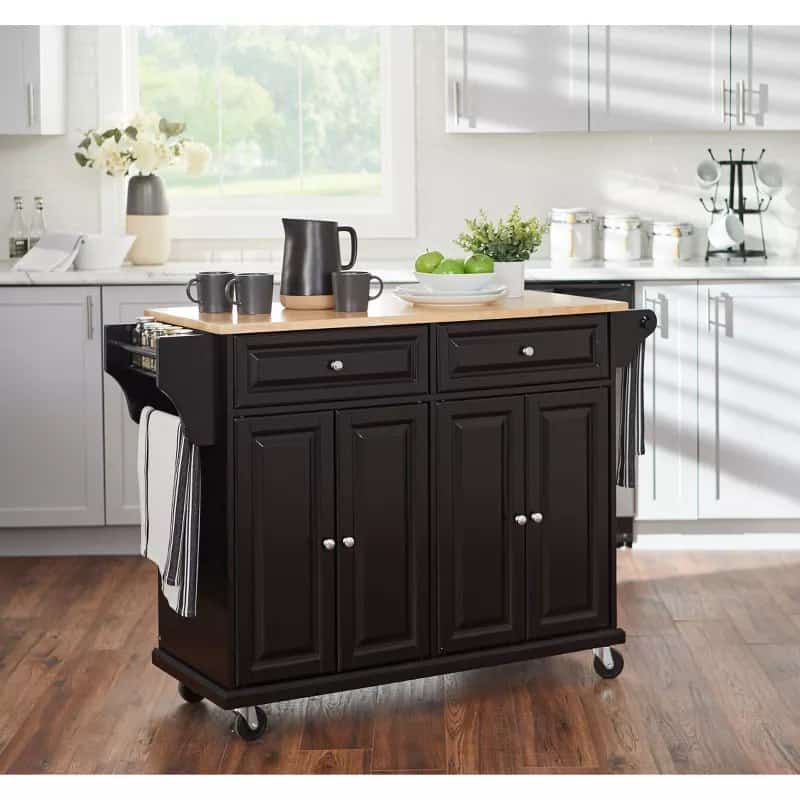
- Countertop Material: Select a durable material for the cart’s countertop, such as butcher block or granite. This will provide a sturdy surface for food preparation.
- Handles: Consider adding handles to the sides of your cart for easy maneuverability. Select handles that combine practicality with visual appeal for an optimal choice.
- Casters or Wheels: To make your kitchen cart mobile, you will need casters or wheels. Opt for heavy-duty options that can support the weight of the cart and its contents.
- Wood Stain or Paint: Decide whether you want to stain or paint your kitchen cart to match your kitchen decor. Choose a finish that is suitable for the type of wood you are using.
- Wood Glue: Use wood glue to reinforce joints for added stability. Make sure to choose a strong adhesive that is compatible with your wood type.
Tools:
- Drill: A drill will be essential for making holes, driving screws, and attaching various components together. Opt for a cordless drill for ease of use.
- Circular Saw or Miter Saw: You’ll need a saw to cut the lumber to the desired dimensions. A circular saw or miter saw will work well for this purpose.
- Measuring Tape: Accurate measurements are crucial for a well-built cart. Use a measuring tape to ensure precise cuts and dimensions.
- Clamps: Clamps will be useful for holding pieces together while the glue dries or when securing joints. Choose clamps that are suitable for the size of your project.
- Screwdriver: You’ll need a screwdriver for tightening screws and assembling the various components. Consider using a power screwdriver for efficiency.
- Sandpaper: Smooth out any rough edges and surfaces with sandpaper for a professional finish. Choose different grits depending on the level of smoothing required.
By gathering all the necessary materials and tools upfront, you’ll be well-prepared to embark on your kitchen cart construction project. Remember to follow the manufacturer’s instructions for each tool and use proper safety precautions throughout the process. With a little effort and creativity, you’ll have a functional and stylish kitchen cart that enhances your cooking experience.
Provide Recommendations For The Type And Quality Of Wood To Use, As Well As The Required Hardware.
Our comprehensive guide on how to build a kitchen cart includes expert recommendations for the best type and quality of wood to use, as well as the necessary hardware for a successful project.
Recommendations For Wood And Hardware
When building a kitchen cart, it’s essential to choose the right wood and hardware to ensure durability and functionality. Below are recommendations for the type and quality of wood to use, as well as the required hardware.
Type And Quality Of Wood:
- Hardwoods: Choose hardwoods such as maple, cherry, or oak for their strength and durability. These woods are sturdy enough to withstand constant use and will provide longevity to your kitchen cart.
- Plywood: If you’re on a budget, consider using high-quality plywood such as Baltic birch. It offers stability and strength while being more cost-effective than hardwoods.
- Avoid Softwoods: Avoid using softwoods like pine or cedar, as they are more prone to dents and dings, compromising the kitchen cart’s overall quality and lifespan.
Required Hardware:
- Castors: Opt for heavy-duty swivel castors with brakes to allow the cart to move easily and stay in place when needed.
- Drawer Slides: Choose full-extension ball-bearing drawer slides for smooth and effortless opening and closing of drawers.
- Handles and Knobs: Select durable and visually appealing handles and knobs that complement the overall design of the kitchen cart.
- Screws and Fasteners: Use high-quality, corrosion-resistant screws and fasteners to ensure the structural integrity of the cart.
Remember, the choice of wood and hardware greatly impacts the functionality and aesthetics of your kitchen cart. By selecting the right materials, you can ensure that your DIY project will result in a stunning and practical addition to your kitchen.
Planning And Design
Learn how to build a kitchen cart with effective planning and design for a functional and stylish addition to your kitchen space. This step-by-step guide will help you create a DIY kitchen cart that meets your specific needs and enhances your culinary experience.
Tips For Ing A Kitchen Cart
Designing a functional and stylish kitchen cart involves careful planning and attention to detail. From determining the cart’s dimensions to selecting the right materials, several factors should be considered for a successful project.
Planning:
- Identify the Purpose: Consider how you intend to use the kitchen cart. Will it primarily serve as additional storage, a portable workspace, or a multi-functional piece? Define its purpose to guide the planning process.
- Evaluate Space: Assess the available space in your kitchen to determine the ideal size for the cart. Take measurements and consider factors such as clearance around the cart when in use and the overall flow of the space.
- Functionality: Determine the features and components you want to incorporate into the design. Consider elements such as shelves, drawers, hooks, and a countertop. Additionally, think about mobility, whether you want the cart to have wheels, and if you need it to be collapsible or have a drop-leaf design.
Design:
- Material Selection: Choose materials that align with your kitchen’s aesthetic and provide durability. Consider options such as wood, metal, or a combination of both. Additionally, explore different finishing options to complement the overall design.
- Aesthetic Appeal: Consider the design elements that will complement your kitchen’s style. Whether you prefer a modern, rustic, or industrial look, select design elements, such as hardware and finishes, that align with the existing decor.
- Accessibility: Ensure that the cart’s design offers easy access to its contents. Optimize the layout to provide convenient storage and efficient usage of the cart’s surface area. Consider factors such as reachable heights for various items and accessibility to drawers and doors.
Careful planning and thoughtful design considerations are essential when embarking on a kitchen cart project. By evaluating the cart’s purpose, space requirements, functionality, materials, aesthetics, and accessibility, you can ensure that your vision for the kitchen cart is translated into a practical and visually appealing addition to your kitchen.
Discuss The Importance Of Planning And Designing The Cart Before Starting The Construction Process.
Planning and designing the kitchen cart before construction is essential in ensuring a successful and functional end result. This crucial step helps to optimize space, organize tools and utensils, and create a cart that fits seamlessly into the kitchen layout.
Importance Of Planning And Designing The Cart Before Starting The Construction Process
Before embarking on the construction of a kitchen cart, it is crucial to emphasize the significance of careful planning and thoughtful design. Taking the time to meticulously plan and design your cart will help ensure a successful and satisfying outcome.
Here are some key points to consider:
- Efficient Space Utilization: Planning allows you to optimize the cart’s design, ensuring maximum storage capacity and efficient use of space in your kitchen. By carefully considering dimensions, placement of shelves, and compartments, you can create a cart that meets your specific needs.
- Functionality and Convenience: Designing the cart with its intended purpose in mind is crucial. Think about how you intend to use the cart—will it primarily serve as a food preparation area, an additional storage space, or a mobile serving station? By envisioning its functionality, you can incorporate features and elements that enhance its practicality and convenience.
- Material Selection: Proper planning enables you to choose the right materials for your kitchen cart. Depending on your budget, style preferences, and durability requirements, you can select materials such as wood, stainless steel, or even repurposed items. With careful consideration, you can choose materials that complement your kitchen’s aesthetic and ensure long-lasting durability.
- Design Aesthetics: The design of your kitchen cart should blend seamlessly with the overall aesthetic of your kitchen. By planning ahead, you can coordinate its style, color scheme, and finish with existing furniture and decor. This cohesive design approach adds visual appeal and enhances the overall ambiance of the space.
- Safety Considerations: Planning ahead also entails considering safety aspects. If your kitchen cart will include features such as wheels or locks, incorporating them into the design from the beginning ensures a smooth construction process and minimizes the likelihood of accidents or flaws.
By carefully planning and designing your kitchen cart, you can create a functional, aesthetically pleasing, and safe addition to your kitchen. It sets the foundation for a successful construction process and helps you achieve your desired outcome. So, grab your pen and paper, sketch out your ideas, and let your creativity flow before you pick up any tools.
Cover Key Considerations, Including Dimensions, Layout, Storage Options, And Any Specific Features You Want To Incorporate.
When building a kitchen cart, it’s important to consider dimensions, layout, and storage options. Incorporating specific features like adjustable shelves and a sturdy countertop can enhance functionality. Customizing the design to your preferences will ensure a practical and stylish addition to your kitchen space.
Cover Key Considerations, Including Dimensions, Layout, Storage Options, And Any Specific Features You Want To Incorporate.
When it comes to building a kitchen cart, there are several key considerations you need to keep in mind to ensure its functionality and practicality. These considerations include dimensions, layout, storage options, and any specific features you want to incorporate.
Here’s a breakdown of each aspect:
Dimensions:
- Determine the available space in your kitchen to ensure the cart fits perfectly without obstructing movement.
- Consider the height, width, and depth of the cart in relation to your kitchen’s layout.
- Measure the dimensions of your appliances or items that will be placed on the cart to ensure ample space.
Layout:
- Think about the layout of your kitchen and how the cart will fit into the overall space.
- Consider factors like countertop height, cabinet placement, and walkway clearance to create a seamless integration.
- Choose a layout that provides easy access to the items you frequently use on the cart.
Storage Options:
- Decide on the type and amount of storage you need on your kitchen cart.
- Incorporate shelves, drawers, or cabinets to accommodate different items such as utensils, cookware, or spices.
- Prioritize functionality by selecting storage options that are easily accessible and organized.
Specific Features:
- Determine any specific features or functionalities you want to incorporate into your kitchen cart.
- This could include a drop-leaf or extendable top for additional workspace, a built-in knife block, or hooks for hanging utensils.
- Consider your unique needs and preferences to tailor the cart to your specific requirements.
Building a kitchen cart involves careful consideration of dimensions, layout, storage options, and specific features. By taking these factors into account, you can create a functional and efficient cart that seamlessly integrates into your kitchen.
Step-by-step Construction
Learn the step-by-step construction process for building a versatile kitchen cart. This practical guide provides clear instructions and detailed illustrations to help you create your own portable workspace. From selecting materials to assembling the final product, you’ll gain valuable insight into crafting a functional and stylish addition to your kitchen.
Building your own kitchen cart can be a rewarding project that adds both functionality and style to your kitchen. Whether you’re a seasoned DIYer or a beginner, this step-by-step guide will walk you through the construction process. With some basic tools, materials, and a little bit of patience, you’ll have a beautiful kitchen cart in no time.
Materials Needed:
- Plywood: 1 sheet (¾ inch thick)
- Hardwood boards: 4 boards (1×3 inch)
- Wood glue
- Screws (1 ¼ inch and 2 inch)
- Casters: 4 swivel casters with brakes
- Drawer slides: 2 pairs
- Drawer knobs or handles
- Sandpaper
- Stain or paint
- Polyurethane or clear sealant
To get started, gather all the materials you’ll need for this project. Make sure to measure the dimensions of your kitchen cart based on the available space and your specific requirements.
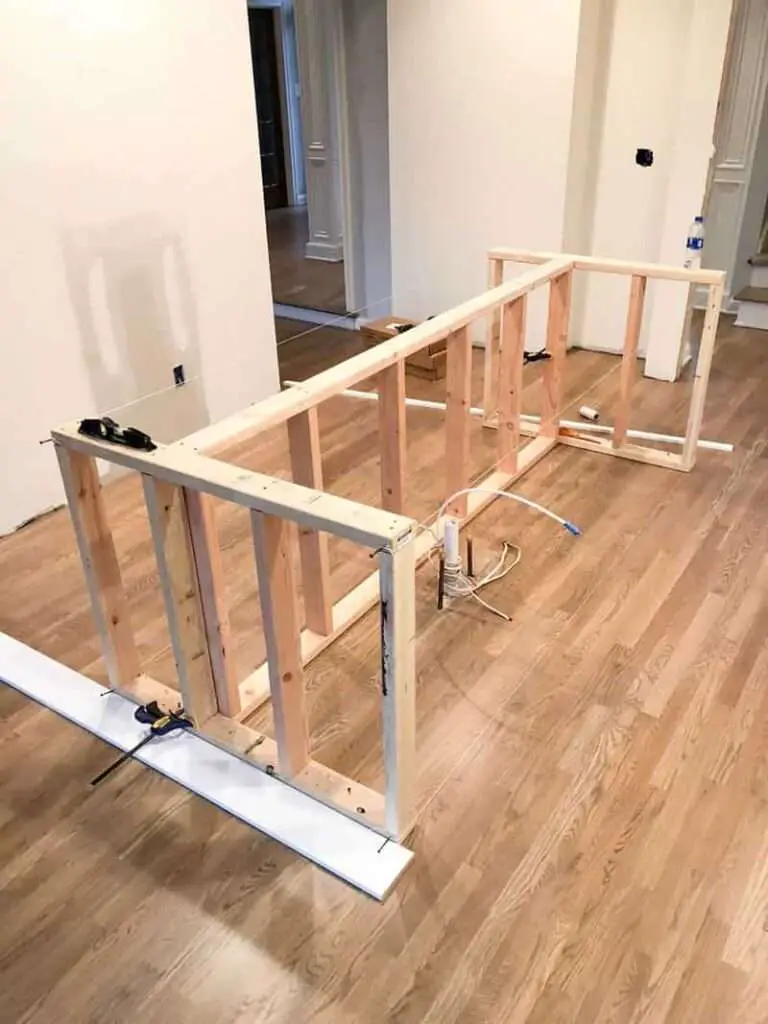
Step 1: Cutting The Plywood:
- Measure and mark the dimensions of the kitchen cart on the plywood sheet.
- Use a circular saw or a table saw to cut out the top, bottom, sides, and shelves of the cart.
Step 2: Assembling The Base:
- Attach the sides to the bottom piece using wood glue and screws.
- Ensure the corners are square and use clamps to hold the pieces in place while the glue dries.
- Attach the casters to the bottom corners of the base for easy mobility.
Step 3: Constructing The Shelves:
- Measure and cut the plywood pieces for the shelves.
- Attach the shelves inside the kitchen cart using wood glue and screws.
- Place additional support boards underneath the shelves for added stability.
Step 4: Building The Drawers:
- Cut the front, back, and side pieces of the drawers from the plywood.
- Attach the drawer slides to the sides of the kitchen cart and the corresponding sides of the drawer pieces.
- Slide the drawer into place and secure it with screws.
- Attach the drawer knobs or handles to the front of the drawers.
Step 5: Sanding And Finishing:
- Sand the entire kitchen cart to smooth out any rough edges.
- Apply a coat of stain or paint to achieve your desired finish.
- Ensure the stain or paint dries entirely before moving on to the next step.
- Apply a layer of polyurethane or clear sealant to protect the wood and enhance its durability.
And there you have it! With these step-by-step instructions, you’ll be able to build your very own kitchen cart. Customize it with your choice of finishes, colors, and additional features to make it a perfect addition to your kitchen. Happy building!
Detail Each Step Of The Construction Process, From Cutting The Wood To Assembling The Cart’s Structure And Attaching The Wheels.
This detailed guide outlines each step of constructing a kitchen cart, including wood cutting, structure assembly, and wheel attachment. Build your own functional and stylish cart effortlessly.
How To Build A Kitchen Cart
Are you in need of some extra storage space and functionality in your kitchen? Building a kitchen cart might be the perfect solution for you! In this guide, we will detail each step of the construction process, from cutting the wood to assembling the cart’s structure and attaching the wheels.
So let’s get started!
Gathering Materials And Tools
To begin building your kitchen cart, you will need to gather the necessary materials and tools. Below is a list of the necessary items:
- Plywood sheet: This will be used for the base and shelves of the cart.
- 2×4 lumber: You will need this for the frame and support of the cart.
- Wood screws: These will be used to attach the different components together.
- Casters: Choose sturdy wheels that can support the weight of the cart.
- Drill: This will be used to make holes and drive screws.
- Saw: Whether it’s a circular saw or a handsaw, you will need it for cutting the wood.
- Measuring tape: It is essential for accurate measurements.
- Utilize sandpaper to eliminate any rough surfaces from the wood and achieve a smooth finish.
Cutting The Wood
Once you have gathered all the necessary materials, the first step is to cut the wood to the desired dimensions. Here’s what you need to do:
- Measure and mark the dimensions for the base, shelves, and frame.
- Use the saw to carefully cut the plywood sheet and 2×4 lumber.
- Double-check the measurements to ensure accuracy.
Assembling The Cart’s Structure
Now that you have all the wood pieces cut to size, it’s time to assemble the structure of your kitchen cart. Follow these steps:
- Start by constructing the frame using the 2×4 lumber. Use wood screws to secure the corners of the frame.
- Attach the base to the frame using wood screws, ensuring it is level and securely fastened.
- Install the shelves at the desired height, again using wood screws to hold them in place.
- Double-check the stability of the structure, tightening any loose screws if necessary.
Attaching The Wheels
The final step in building your kitchen cart is attaching the wheels. Here’s what you need to do:
- Mark the positions for the wheel mounts on the base of the cart.
- Attach the casters to the base using screws or bolts, making sure they are properly aligned and securely fastened.
- Test the cart’s mobility by gently pushing it to ensure the wheels roll smoothly.
And there you have it! You have successfully built your own kitchen cart. Now you can enjoy the convenience of additional storage and workspace in your kitchen. Happy cooking and organizing!
Include Tips And Tricks For Ensuring Precision And Durability During Construction.
Learn how to build a kitchen cart with precision and durability. Discover tips and tricks that ensure a sturdy construction, making your cart ready to handle all your kitchen needs.
Tips And Tricks For Ensuring Precision And Durability During Construction
Constructing a kitchen cart requires attention to detail and precision for optimal durability. Here are essential tips and tricks to ensure the construction process yields a sturdy and long-lasting kitchen cart:
- Accurate Measurements: Utilize precise measuring tools such as a tape measure, ruler, or square to ensure accurate dimensions for all components of the kitchen cart. This step will guarantee a snug fit for all parts during the assembly process, resulting in a sturdy final product.
- Quality Materials Selection: Choose high-quality materials such as solid wood or metal for the construction of the kitchen cart. Opting for durable materials will enhance the longevity and robustness of the cart, making it capable of withstanding the rigors of everyday use in the kitchen.
- Proper Joinery Techniques: Employ reliable joinery techniques such as dovetail joints, mortise and tenon, or pocket hole screws to securely connect the different parts of the kitchen cart. This method ensures that the cart remains stable and durable, even when subjected to heavy loads or frequent movement.
- Attention to Finishing Details: Pay close attention to the finishing details of the kitchen cart, including sanding all surfaces to a smooth finish and applying a protective sealant or finish. This meticulous approach will not only enhance the overall aesthetic appeal but also provide added durability and resistance to wear and tear.
By implementing these tips and tricks, you can ensure that the construction process of the kitchen cart results in a precisely crafted and durable addition to your kitchen space.
Customization And Finishing Touches
Looking to build a kitchen cart? Add your personal touch with customization and finishing touches to create a unique and functional piece for your space. From choosing materials to adding special features, the possibilities are endless!
When it comes to building a kitchen cart, the real fun lies in customizing and adding those finishing touches that make it your own. Whether you want to match your existing kitchen decor or add a unique touch, here are a few ways to take your kitchen cart to the next level.
Customization Options:
- Color and Finish: A fresh coat of paint or stain can transform the look of your kitchen cart. Consider matching it to your kitchen cabinets or creating a bold pop of color.
- Hardware: Upgrade the hardware with stylish drawer pulls and knobs to enhance the overall aesthetic of your cart.
- Additional Storage: If you need extra storage, consider adding hooks or baskets to the sides of the cart for hanging utensils or storing small items.
Personalized Features:
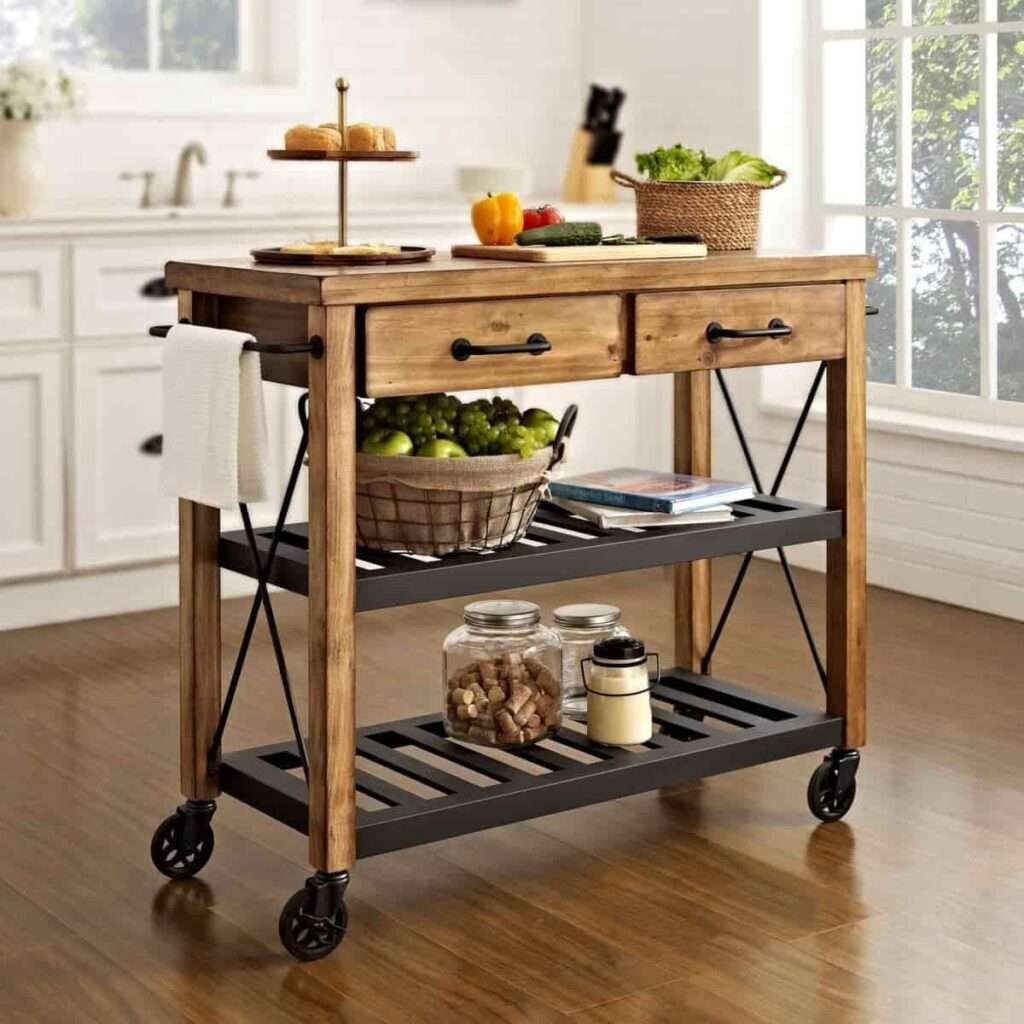
- Butcher Block or Marble Top: Swap out the standard top for a butcher block or marble to add a touch of elegance and functionality to your cart.
- Custom Shelves or Racks: Incorporate personalized shelves or racks that suit your specific kitchen needs, such as wine bottle holders or spice racks.
- Personalization: Add a personal touch with a chalkboard or corkboard panel where you can jot down notes or display recipes.
By incorporating these customization and finishing touches, you can elevate your kitchen cart to suit your style and make it a standout feature in your kitchen.
Explore Opportunities For Personalizing The Kitchen Cart, Such As Adding Hooks, Shelves, Or A Towel Rack.
Discover endless possibilities for customization with your kitchen cart by incorporating practical features like hooks, shelves, or a towel rack. Tailor your cart to meet your unique needs and enhance the functionality of your kitchen space.
Explore Opportunities For Personalizing The Kitchen Cart, Such As Adding Hooks, Shelves, Or A Towel Rack.
Adding your personal touch to a kitchen cart can not only enhance its functionality but also make it a stylish and unique addition to your kitchen. Here are some ideas to help you personalize your kitchen cart:
- Hooks: Attach hooks to the sides or underside of the kitchen cart to hang utensils, oven mitts, or small pots and pans. This will keep your essentials within reach and add a decorative element to the cart.
- Shelves: Consider adding shelves to the cart to create more storage space. You can use these shelves to display your cookbooks, store spice jars, or keep frequently used ingredients readily accessible.
- Towel rack: Install a towel rack on one side of the cart to conveniently hang kitchen towels or dishcloths. This will ensure that you always have a towel close by for spills or to wipe your hands while cooking.
- Chalkboard or whiteboard: Transform a section of the kitchen cart into a chalkboard or whiteboard to jot down grocery lists, meal plans, or recipe ideas. This feature adds a practical and playful touch to your cart.
- Wine rack: If you’re a wine enthusiast, consider incorporating a wine rack into the design of your kitchen cart. This will provide a dedicated space to store your favorite bottles and add a touch of elegance.
- Decorative hardware: Swap out the standard hardware that comes with the cart for decorative knobs or pulls that match your kitchen’s aesthetic. This simple change can drastically elevate the overall look of the cart.
Remember, personalizing your kitchen cart allows you to tailor it to your specific needs and style preferences. Get creative and make it a reflection of your unique personality.
Discuss Finishing Options, Such As Staining, Painting, Or Varnishing, To Protect The Wood And Enhance The Cart’s Aesthetic Appeal.
In protecting the wood and enhancing the cart’s aesthetic appeal, it’s essential to consider finishing options like staining, painting, or varnishing. These options not only offer protection but also add an attractive finish to the kitchen cart.
Discuss Finishing Options, Such As Staining, Painting, Or Varnishing, To Protect The Wood And Enhance The Cart’s Aesthetic Appeal.
When it comes to building a kitchen cart, choosing the right finishing options is essential not only for protecting the wood but also for enhancing its visual appeal. From staining to painting or varnishing, there are various methods to consider.
Here, we’ll explore these finishing options in detail and help you make the best choice for your kitchen cart.
Staining:
- Staining the wood is a popular choice as it allows the natural beauty of the grain to show through.
- Choose from a wide range of stain colors, from light to dark, to match your kitchen decor.
- Before applying the stain, ensure the wood is smooth and free from any dirt or debris.
- Use a brush or a cloth to evenly apply the stain, following the manufacturer’s instructions.
- Give the stain ample time to permeate the wood as per the recommended duration before removing any surplus.
- Finally, apply a clear coat of varnish or polyurethane to protect the stain and add a glossy finish.
Painting:
- Painting the kitchen cart can be an excellent option if you want to add a pop of color or match it with your existing kitchen theme.
- Start by preparing the wood surface, ensuring it is clean, dry, and smooth.
- Apply a primer to create a smooth base for the paint and improve its durability.
- Allow the primer to dry completely before applying multiple coats of paint, ensuring each coat is even and fully dry before the next application.
- Consider using a brush for detailed areas and a roller for larger surfaces to achieve a professional finish.
- Once the paint has dried, you can add a clear coat or sealant for added protection and durability.
Varnishing:
- Varnishing is a suitable option if you want to showcase the natural beauty of the wood while providing a protective layer.
- Before varnishing, sand the wood surface to ensure it is smooth and free from imperfections.
- Apply the varnish in thin, even coats, using a brush or a cloth.
- Allow each coat to dry completely before applying the next one, lightly sanding between coats for a smooth finish.
- Depending on the type of varnish used, you may need to apply multiple coats to achieve the desired level of protection.
- Once the varnish has dried, your kitchen cart will boast a beautiful, glossy finish that protects the wood for years to come.
Always make sure to follow the manufacturer’s instructions for the chosen finishing method to ensure the best results. Whether you opt for staining, painting, or varnishing, the right finishing touch will not only protect your kitchen cart but also enhance its aesthetic appeal, adding a touch of style to your culinary space.
Utilization And Maintenance
Looking to build a kitchen cart? Start by utilizing quality materials and following a detailed maintenance plan. Ensuring proper construction and regular upkeep will result in a functional and long-lasting addition to your kitchen.
The utilization and maintenance of your kitchen cart are crucial for its longevity and functionality. To ensure that your kitchen cart remains a valuable addition to your space, take note of the following guidelines:
Maximizing Storage Space:
- Utilize the shelves and compartments of your kitchen cart to efficiently store your cooking essentials, utensils, and small appliances.
- Arrange items in an organized manner to maximize space and ensure easy accessibility.
- Consider using bins or containers to further optimize storage and keep smaller items well-organized.
Cleaning And Sanitizing:
- Regularly clean your kitchen cart to maintain hygiene and prevent the buildup of dirt and food residues.
- Use a mild detergent and warm water to wipe down the surfaces of the cart, including the countertop and shelves.
- Pay attention to spills and stains, promptly cleaning them to avoid potential damage or discoloration.
Protecting The Surface:
- Apply a protective coating, such as a food-grade sealant or wax, to the countertop surface to enhance its durability and resistance to stains.
- Use cutting boards or trivets when placing hot pots, pans, or sharp objects on the cart to prevent scratches or heat damage.
- Avoid placing heavy or abrasive items directly on the countertop to prevent potential damage.
Regular Inspection And Maintenance:
- Periodically inspect the cart for any loose screws, hinges, or wheels. Tighten or replace them as necessary to ensure stability and functionality.
- Check the wheels and casters for smooth operation, and clean them regularly to prevent debris accumulation.
- Keep an eye out for any signs of wear or damage on the cart’s components, addressing them promptly to prevent further issues.
Realigning And Re-leveling:
- If your kitchen cart starts to wobble or become unsteady, check if it needs realignment. Adjust the wheels or legs to ensure even weight distribution.
- Make sure the cart is level on all sides to prevent any stability issues and optimize its functionality.
Remember, proper utilization and maintenance are essential for the longevity and functionality of your kitchen cart. By following these guidelines, you can make the most out of this versatile addition to your kitchen and ensure its optimal performance.
Offer Practical Ideas For Using The Kitchen Cart, Such As Additional Counter Space, Storage For Kitchen Utensils, Or A Mobile Serving Station.
This build guide offers practical ideas for using a kitchen cart, including additional counter space, storage for utensils, and a mobile serving station. Discover how to make the most of this versatile piece in your kitchen.
Practical Ideas For Using The Kitchen Cart
If you’re looking to add functionality and style to your kitchen, a kitchen cart is a must-have addition. With its versatile features, a kitchen cart offers a range of practical uses, making it an essential piece of furniture for any cooking space.
From providing extra counter space to serving as a mobile storage unit for kitchen utensils, a kitchen cart can greatly enhance your culinary experience. Let’s explore some practical ideas for using a kitchen cart:
Additional Counter Space:
- Create more room for meal prep: With a kitchen cart, you can easily extend your counter space, making it easier to prepare meals, chop vegetables, or assemble ingredients.
- Accommodate multiple cooks: If you enjoy cooking with a partner or family member, a kitchen cart provides an additional surface for shared meal preparation, preventing overcrowding in your kitchen.
- Serve as a temporary bar area: When hosting gatherings or special occasions, the kitchen cart can serve as a makeshift bar, providing ample space for mixing drinks, displaying beverages, and entertaining guests.
Storage For Kitchen Utensils:
- Organize your tools: Utilize the shelves, drawers, and compartments of your kitchen cart to neatly store and retrieve essential kitchen utensils such as spatulas, measuring cups, whisks, and more.
- Keep essential ingredients within reach: Store frequently used sauces, spices, or oils on your kitchen cart’s surface or in designated compartments, making them easily accessible while cooking.
- Create a dedicated baking station: Arrange your baking supplies, such as mixing bowls, pans, and measuring spoons, on the kitchen cart, allowing for a dedicated space for all your baking needs.
Mobile Serving Station:
- Effortless serving: With its mobility, a kitchen cart can function as a convenient serving station, allowing you to transport food, drinks, and utensils directly to your dining area or outdoor space.
- Host outdoor gatherings: Take advantage of the kitchen cart’s portability by using it as a mobile barbeque station or a hub for serving refreshments during outdoor parties or gatherings.
- Convenient cleanup: After a celebration or meal, use the kitchen cart as a mobile cleanup station, collecting dirty dishes, glasses, and utensils for easy transport to the sink or dishwasher.
A kitchen cart offers versatility and practicality, adding both style and functionality to your kitchen. Whether you need additional counter space, efficient utensil storage, or a mobile serving station, a kitchen cart is an excellent solution. Incorporating a kitchen cart into your kitchen decor empowers you to enjoy a more efficient and enjoyable cooking experience.
Provide Maintenance Tips To Keep The Cart In Optimal Condition And Ensure Its Longevity.
Learn how to build a kitchen cart and keep it in top-notch condition for years to come with these essential maintenance tips. Ensure the longevity of your cart by following these easy-to-implement strategies.
Maintaining Your Kitchen Cart
Maintaining your kitchen cart is essential for keeping it in optimal condition and ensuring its longevity. Follow these maintenance tips to preserve the beauty and functionality of your kitchen cart.
Regular Cleaning And Inspection
- Wipe down the surfaces of the cart with a damp cloth and mild cleaning solution to remove any spills or stains.
- Inspect the wheels and tighten any loose screws to ensure smooth mobility.
- Inspect for any indications of deterioration, such as loose connections or flaked paint, and attend to them without delay.
Preventing Water Damage
- Avoid placing hot pots or wet dishes directly on the cart’s surface to prevent water damage.
- Use coasters or trivets to protect the wood from moisture and heat, preserving its finish.
Seasonal Maintenance
- Apply a coat of food-safe mineral oil to the wooden components of the cart every six months to prevent the wood from drying out and cracking.
- Inspect the cart for any signs of rust on metal components and treat them with a rust-resistant spray as needed.
By following these maintenance tips, you can ensure that your kitchen cart remains in great condition, serving you well for years to come.
Assembling Your Kitchen Cart
Once you’ve gathered all the necessary materials and tools, it’s time to start assembling your very own kitchen cart. Below are the detailed and sequential guidelines crafted exclusively for your assistance:
- Step 1: Begin by laying out all the pieces of wood and hardware in an organized manner. This will make the assembly process much smoother and more efficient.
- Step 2: Attach the casters to the base of the cart. Ensure they are securely attached to provide stability and mobility.
- Step 3: Assemble the frame of the cart using the pre-cut wood pieces. Make sure to align the pieces accurately and use appropriate screws for a sturdy build.
- Step 4: Attach the top surface of the cart to the frame. This will serve as the working area and should be secured tightly to withstand daily use.
- Step 5: Install the additional shelves and drawer if applicable, ensuring they are level and secure.
- Step 6: Once all the components are assembled, do a final check to ensure everything is tightly secured, level, and aligned.
Maintenance And Care Tips
After you have successfully built your kitchen cart, it’s important to maintain and care for it to ensure longevity and functionality. Here are some simple tips to keep your kitchen cart in top condition:
- Regular Cleaning: Wipe down the surfaces with a damp cloth after each use to prevent the accumulation of dirt or grime.
- Wood Treatment: Apply a wood-friendly oil or wax to the cart’s surface to maintain its luster and prevent drying or cracking.
- Inspect Hardware: Periodically check the casters, screws, and other hardware for any signs of loosening or damage, and tighten or replace as needed.
- Avoid Overloading: Be mindful of the weight capacity of your kitchen cart and refrain from overloading it to prevent structural strain.
- Protect from Moisture: Place a protective mat or coaster under hot or moist items to prevent damage to the wood surface.
These simple maintenance steps will help prolong the life of your kitchen cart and ensure it remains a functional and stylish addition to your culinary space.
Summarize The Benefits Of Building A Customized Kitchen Cart.
Customized kitchen carts offer a range of benefits, including increased storage space and versatility. With a personalized design, you can optimize your cart to fit your kitchen layout and specific needs, making cooking and entertaining more convenient and enjoyable.
Benefits Of Building A Customized Kitchen Cart
A customized kitchen cart can be a valuable addition to any kitchen, providing both functionality and aesthetic appeal. Building your own kitchen cart allows you to tailor it to your specific needs and preferences, ensuring that it perfectly complements your kitchen space.
Here are some benefits of building a customized kitchen cart:
- Personalization: By building your own kitchen cart, you have complete control over its design and features. You can customize it to match the style of your kitchen, incorporating your favorite colors, materials, and finishes. This allows you to create a cart that is uniquely yours and adds a personal touch to your kitchen decor.
- Optimal Use of Space: A customized kitchen cart can be designed to fit perfectly into your kitchen’s layout, making efficient use of the available space. You can choose the dimensions and configuration of the cart to maximize storage and workspace. Whether you have a small kitchen with limited counter space or a large kitchen that requires additional storage, a custom kitchen cart can be designed to meet your specific requirements.
- Versatility: One of the great advantages of a customized kitchen cart is its versatility. You can choose to include various features and accessories based on your needs. For example, you can incorporate drawers, shelves, racks, or even a built-in cutting board. This flexibility allows you to create a multi-functional cart that can serve as extra countertop space, a storage unit, or a mobile bar for entertaining guests.
- Cost-Effective: Building your own kitchen cart can actually save you money compared to buying a pre-made one. You have the opportunity to choose affordable materials and repurpose existing items, such as repurposing an old bookshelf or cabinet. Additionally, by DIYing your kitchen cart, you eliminate the cost of labor that would be associated with purchasing a pre-built cart.
- Enhanced Organization: One of the primary benefits of a kitchen cart is the added storage it provides. With a customized cart, you can design specific compartments and shelves to keep your kitchen essentials organized and easily accessible. This eliminates clutter on your countertops and ensures that everything has its designated place, making meal preparation more efficient and enjoyable.
- Mobility: Another advantage of a customized kitchen cart is its mobility. Most kitchen carts come with wheels, allowing you to easily move them around your kitchen or even to other rooms if needed. This flexibility provides you with the convenience of having additional workspace or storage wherever you require it. Whether you want to use it as a serving trolley during parties or simply move it closer to your stove for easier access to ingredients, a mobile kitchen cart offers great convenience.
Building a customized kitchen cart offers numerous benefits, allowing you to create a practical and aesthetically pleasing addition to your kitchen. By tailoring it to your needs, you can optimize space utilization, enhance organization, and add a personal touch to your kitchen decor.
So why settle for a generic cart when you can have one that is uniquely yours? Get creative and start building your customized kitchen cart today!
Encourage Readers To Embark On Their Diy Project And Enjoy The Satisfaction Of Creating A Functional And Personalized Addition To Their Kitchen Space.
Embark on a DIY project to build a personalized and functional kitchen cart, adding a unique touch to your space. Enjoy the satisfaction of creating something special that suits your needs perfectly. With simple tools and materials, you can easily bring this project to life.
Embark On A Rewarding Diy Project
Create your very own kitchen cart and experience the joy of crafting a functional and personalized addition to your kitchen space. Building a kitchen cart is a fantastic DIY project that allows you to showcase your creativity while enhancing the practicality of your kitchen.
With just a few tools and materials, you can construct a stylish and versatile cart that will not only serve as extra storage and workspace but also become a centerpiece of your culinary haven. So, let’s dive into the world of DIY and uncover the steps required to build your own kitchen cart!
Gather The Necessary Materials
To embark on your kitchen cart journey, you will need specific materials that will serve as the building blocks for your creation. Here’s a list of essential items you’ll need to get started:
- Plywood sheets: Choose sturdy plywood sheets of appropriate thickness for the cart’s structure and shelves.
- Four casters: Select high-quality casters that can withstand the weight of the cart and provide easy mobility.
- Screws: Ensure you have an ample supply of screws in various sizes to securely fasten the cart’s components.
- Wood glue: Opt for a strong wood glue to reinforce the joints and ensure the longevity of your kitchen cart.
- Drill: A reliable drill will be your go-to tool for creating pilot holes and attaching screws.
- Saw: Depending on the design, you will need either a circular saw or a jigsaw for cutting the plywood.
Design And Measurements
Before starting the construction process, it is crucial to have a well-thought-out design and accurate measurements for your kitchen cart. Consider the available space in your kitchen and the intended purpose of the cart. Think about the number of shelves, drawers, and any additional features you might want to incorporate into your design.
Once you have a clear vision, measure the dimensions of each component and sketch out a detailed plan. This step will ensure that your kitchen cart fits perfectly into your space and serves your specific needs.
Cut And Assemble With Care
With your design and measurements in hand, it’s time to bring your kitchen cart to life. Follow these basic steps to cut and assemble the various components:
- Start by cutting the plywood sheets according to the dimensions of the cart’s sides, shelves, and any other parts specified in your design.
- Create pilot holes using a drill to prevent the wood from splitting when you attach the screws.
- Apply wood glue to the edges of the plywood pieces, ensuring a secure bond when assembling.
- Attach the sides, shelves, and back panel together using screws and a drill. Double-check the alignment and use clamps to hold the pieces in place until the glue dries.
- Install the casters to the bottom of the cart, ensuring they are evenly spaced for optimal stability and maneuverability.
- Sand the edges and surfaces to create a smooth finish, removing any roughness or splinters.
- Apply a protective sealant or paint of your choice to enhance the durability and aesthetics of your kitchen cart.
Personalize And Enjoy!
Once the construction is complete, it’s time for the most enjoyable part – personalizing your kitchen cart. Add a touch of your own style by choosing a paint color that complements your kitchen decor. Consider adding hooks, baskets, or other storage solutions to maximize functionality.
Don’t forget to decorate the cart’s surface with plants, cookbooks, or decorative items to infuse your unique personality into your kitchen space. As you admire your newly built kitchen cart, revel in the satisfaction and pride that come from creating a practical and personalized masterpiece that will bring joy to your culinary adventures for years to come.
Embrace the excitement of DIY and let your creativity soar as you build your very own kitchen cart. By following these steps and adding your personal touch, you’ll have an eye-catching and functional addition to your kitchen that will make you the envy of all your friends and family.
So, get ready to enjoy the rewards of your efforts and revel in the satisfaction of a job well done!
Frequently Asked Questions For How To Build A Kitchen Cart
What Materials Are Needed To Build A Kitchen Cart?
To build a kitchen cart, you will need wood, screws, casters, a drill, and a saw. Make sure to use sturdy materials that can withstand the weight and daily use.
What Are The Essential Steps To Build A Kitchen Cart?
Start by measuring and cutting the wood, then assemble the base and add the shelves. Attach the casters, sand the surfaces, and apply a protective finish for a polished look.
How Can I Personalize My Kitchen Cart Design?
You can add hooks for utensils, a towel bar, or baskets for extra storage. Painting or staining the wood in a color that complements your kitchen decor can also personalize the design.
What Are Some Tips For Maintaining A Kitchen Cart?
Regularly clean the cart with a damp cloth and mild soap, and avoid placing hot items directly on the surface. Lubricate the casters if needed and inspect for any loose screws or wobbly parts.
Conclusion
To sum up, constructing a kitchen cart is a rewarding endeavor that enhances functionality and adds an appealing touch to your space. By following the step-by-step guide provided in this blog post, you can effortlessly build a customized cart that suits your needs and style.
Remember to choose durable materials, plan your design carefully, and take your time throughout the process. Enjoy the satisfaction of creating a beautiful and practical addition to your kitchen!