

How to build a kitchen nook bench seat with storage?
Build a kitchen nook bench seat with storage by constructing a simple wooden frame and adding hinged tops. Ensure the dimensions fit your kitchen space for a custom look.
How to build a kitchen nook bench seat with storage? Creating a kitchen nook bench seat with built-in storage can maximize space and add charm to your kitchen. By designing a seating solution that caters to your specific dimensions and style preferences, you can enjoy both functionality and aesthetics. A bench with storage offers a dual-purpose solution—providing a cozy spot for family meals or a morning coffee while keeping kitchen essentials organized and out of sight.
A carefully planned project can seamlessly blend with your kitchen décor and become a favorite gathering spot in your home. With the right tools, materials, and a clear plan, anyone from an experienced DIYer to an ambitious beginner can tackle this project successfully, improving both the utility and appeal of their kitchen nook.
Introduction
Creating a kitchen nook bench seat with storage enhances your dining space and functionality. This guide offers step-by-step instructions on crafting a cozy and practical seating solution for your home.
Crafting a kitchen nook bench seat with integrated storage can be a delightful way to add charm and functionality to your dining area. It’s a cozy spot for morning coffee or evening homework sessions, and with the added benefit of storage, it becomes a practical solution to reduce clutter.
Let’s jump into how you can create this multifunctional piece, combining comfort with clever space utilization.
Choosing The Right Materials For Your Bench
Selecting the proper materials is crucial for ensuring the longevity and sturdiness of your kitchen nook bench. Let’s break down the key considerations:
- Durability: Opt for woods like oak or maple that can handle the wear and tear of daily use.
- Finish: A semi-gloss or gloss paint makes cleaning spills easy and adds a bright touch.
- Cushioning: High-density foam provides comfortable seating that retains its shape over time.
Designing The Structure For Maximum Efficiency
When planning the structure of your bench, consider both aesthetics and practicality. Effective design blends seamlessly with your kitchen’s existing style while maximizing storage potential:
- The height and depth of the bench should accommodate all family members comfortably.
- Think about hinged tops or pull-out drawers for easy access to the storage within.
- Incorporate electrical outlets within the bench for added convenience to use appliances or charge devices right at your nook.
By focusing on these elements, you’ll ensure that your kitchen nook bench is not only pleasing to the eye but also serves your storage needs effectively.
Planning And Preparation
Embarking on a kitchen nook bench seat with storage project demands meticulous planning and preparation. Start by assessing your space to design a functional and stylish seating area that maximizes kitchen storage. Prioritize choosing materials that complement your decor while ensuring durability for everyday use.
Planning Your Kitchen Nook Bench Seat
Embarking on a DIY kitchen nook bench with storage requires strategic planning to ensure that the end result is both functional and stylish. Before diving into the project, it’s crucial to consider the space available, design preferences, materials, and tools needed.
- Measure the Space:
Assess the kitchen nook area to determine the size of the bench seat. This will dictate how much material to purchase and the configuration of the storage.
- Select a Design:
Research various bench seat designs. Decide on a style that complements your kitchen’s décor and meets your storage needs.
- Choose Materials:
Pick durable and aesthetically pleasing materials that can withstand the wear and tear of daily use.
- Gather Tools:
Make certain that you possess all the essential tools required at your disposal. Typical tools for this project might include a saw, drill, screws, sandpaper, and a paintbrush.
- Set a Budget:
Outline a budget to keep expenses in check, accounting for materials, tools, and potential unforeseen costs.
Preparing The Area And Materials
Before the construction phase kicks off, it’s important to prepare the space and materials to ensure a smooth building process.
Start by clearing out the kitchen nook area. Remove any existing furniture and provide ample room to work. Next, prepare your materials by cutting wood to the required dimensions, if not pre-cut. Sand down any rough edges to prevent splinters and ensure a professional finish.
Pre-drilling screw holes can expedite the assembly and provide a cleaner look. Always double-check measurements to avoid mistakes that could impact the bench’s integrity and appearance.
Remember, this groundwork stage is critical; a strong foundation means a strong, reliable kitchen nook bench seat with bountiful storage for years to come.
Building The Frame
Crafting a kitchen nook bench seat with storage starts with building a sturdy frame. Ensuring durability and stability is key to a successful project, setting the stage for comfort and functionality in your cozy dining space.
Embarking on a DIY project to enhance your kitchen’s functionality and comfort can be incredibly rewarding. A kitchen nook bench seat with storage offers a cozy spot for morning coffees and casual meals while tucking away kitchen essentials. Let’s delve into the key steps of constructing the bench’s very backbone: the frame.
Selecting Materials
Before diving into the construction process, it’s crucial to choose the right materials for your bench seat frame. Durability and aesthetics play pivotal roles here, as the bench will likely see daily use.
- Wood Type: Opt for hardwood like oak or maple for a sturdy frame that lasts.
- Thickness: Go for 2×4 or 2×6 lumber to ensure a robust structure.
- Joints: Dowel, mortise and tenon, or pocket hole joints will give your frame extra stability.
Cutting The Wood To Size
Execution begins with precise measurements and cuts. For a seamless building experience, gather all your tools and review the cutting list twice to minimize errors.
- Measure: Double-check dimensions to correspond with your nook’s size before cutting.
- Cut: Use a reliable saw to make straight, clean cuts. Safety goggles are a must here!
- Label: Mark each piece with its placement in the frame for an organized assembly process.
Assembling The Base Frame
The assembly phase requires focus and accuracy. Ensure all your components are neatly aligned and ready for a step-by-step build-up.
- Layout: Position your cut lumber on a flat surface, matching each piece to its respective location.
- Fasten: Begin by securing the outer frame before attaching internal supports, using screws for a tight fit.
- Check: Use a carpenter’s square to verify right angles and adjust as necessary for a perfect rectangle.
Installing Cross Supports
Cross supports are key to both the integrity of the structure and the eventual storage space. Placement and spacing of these supports will impact the overall functionality.
- Space Evenly: Determine equal intervals for supports that will handle the most weight.
- Attach: Secure the supports with screws or bolts for easy adjustability down the line.
- Strength Test: Apply weight to ensure sturdiness; reinforcement may be needed for optimal support.
By following these steps, you’ll have a solid frame that’s ready for seating and storage features. The right materials and assembly techniques will not only provide you with a functional piece but also infuse a dash of your personal style into your kitchen’s ambiance.
Enjoy the process, and soon enough, your kitchen nook will boast a bench seat that’s both a statement piece and a practical addition.

Adding Storage Features
Transform your kitchen nook into a practical haven with a custom-built bench seat that doubles as a storage solution. Craft a cozy, space-saving corner that marries style with functionality, keeping essentials stowed away beneath comfortable seating.
Creating a functional and cozy kitchen nook bench seat with built-in storage can be a rewarding DIY project. Not only does it offer a unique dining experience, but it also provides ample space to stow away your kitchen essentials. Let’s dive into the aspects of adding efficient storage features to your bespoke bench seat.
Choosing The Right Storage Style
Selecting the appropriate storage design is crucial for your kitchen nook bench. Here’s why:
- Accessibility: Drawers can be pulled out for easy reach, making them perfect for items you use frequently.
- Maximized Space: With a lift-up seat, you utilize the entire bench area, ideal for storing bulky items.
Ensure the style meshes with your daily routine and the size of the items you plan to store. Consider the ease of opening and whether children will need access to the contents.
Incorporating Functional Components
To facilitate a smooth building process, keep the following elements in mind:
- Hinges and Lift Mechanisms: Ensure these are durable to withstand regular usage.
- Drawer Slides: Opt for full-extension slides for complete access to drawer contents.
- Handles or Knobs: Choose ergonomic designs for comfort and ease of use.
Each component plays a vital role in the storage bench’s functionality, so select high-quality materials that promise longevity and can handle the wear and tear of daily life.
Customizing For Your Kitchen
A customized storage bench not only adds charm but also caters to your specific needs. Consider these factors:
- Dimensions: Tailor the bench size to fit snugly in your kitchen nook.
- Divider Panels: Installing these can create organized compartments within the bench.
Whether you’re planning to store table linens or your collection of cookbooks, customizing the dimensions and internal layout can make a world of difference in functionality and appearance.
Remember to measure your space carefully and plan for an ergonomic height and depth that will be comfortable for both seating and reaching into the storage area. With thoughtful planning and a bit of creativity, your kitchen nook bench will prove to be as practical as it is inviting.
Upholstering And Finishing
Experience the dual benefits of functionality and style by mastering the craft of building a kitchen nook bench seat with storage. Discover the seamless integration of upholstery and finishing techniques to enhance your dining space’s aesthetics and organization.
Choosing The Right Fabric
Selecting the ideal fabric for your kitchen nook bench is crucial—it’s not only about looking great but also being practical for a high-traffic eating area. Whatever you fancy, be it a bold pattern or a sleek, simple finish, opt for a material that’s stain-resistant and easy to clean.
Durability should be your top priority, given that this spot will likely see its fair share of spills and wear.
Preparing The Bench For Upholstery
Before you dive into the upholstering process, taking the time to properly prepare your bench will pay off in the long run:
- Bench cleaning: Ensure that the bench surface is clean and free of debris. This will provide a clean slate for the fabric.
- Securing the foam padding: Firmly attach your foam padding to the bench seat. Using spray adhesive helps the foam stay in place when you wrap and staple the fabric.
- Measuring and cutting fabric: Accurately measure and cut your selected fabric, accounting for enough excess to wrap around the edges and underneath the bench seat.
Upholstering The Seat
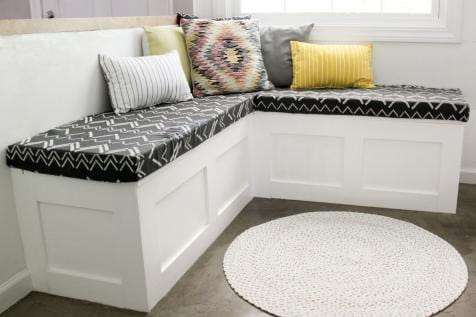
Wrapping your bench in the chosen fabric transforms it from a simple seating solution into a cozy and inviting nook. Stretch the fabric tightly over the padding to avoid any wrinkles or sagging areas. Employ a staple gun to secure the fabric to the underside of the bench, working your way around the seat, and making sure to pull the fabric taut as you go.
Adding Finishing Touches
Once your bench is upholstered, it’s time to give it a polished look:
- Trim excess: Trim away any excess fabric for a tidy, professional appearance.
- Attach piping or trim: For a more refined edge, apply piping or trim using a fabric glue or a staple gun for extra hold.
- Install hinges: If your bench includes storage, install hinges carefully to ensure the seat opens and closes smoothly without catching on the fabric.
Maintaining Your Bench
Now that your kitchen nook bench seat with storage is complete, here are some tips to keep it looking its best:
- Regular cleaning: Regularly wipe down your bench to prevent dust and crumbs from settling into the fabric.
- Spot cleaning: In case of spills, use a fabric cleaner suitable for your material to treat the area promptly to avoid stains setting in.
- Rotate cushions: If your design allows, rotate any loose cushions periodically to ensure even wear over time.
By meticulously upholstering and finishing your kitchen nook bench seat with storage, you create a charming and functional focal point for your space. With proper maintenance, it will serve as a cozy and stylish spot for years to come—perfect for enjoying your morning coffee or a casual meal with loved ones.
Installation And Final Touches
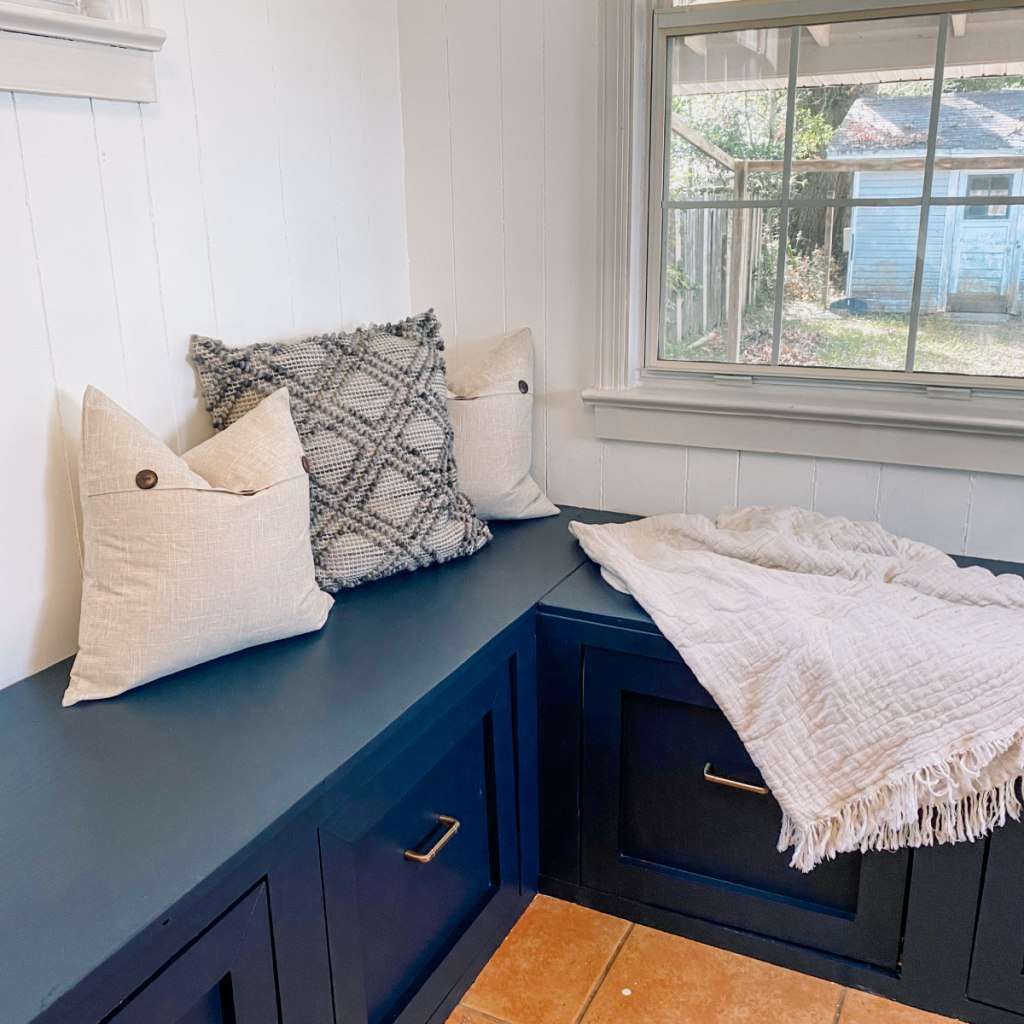
Once the kitchen nook bench seat structure is crafted, secure it in place and affix the final panels for a polished look. Add cushions and storage baskets beneath to combine comfort with functionality in your cozy breakfast corner.
Crafting a kitchen nook bench seat with storage not only maximizes your space but also adds a cozy and inviting touch to your home. By following these steps, you’ll be able to install a functional and stylish seating area that everyone in the family can enjoy.
Preparing The Area For Installation
Before the actual installation begins, preparing the space is crucial to ensure that the bench seat fits perfectly and is level.
- Clear the nook area: Remove any existing furniture or obstacles.
- Clean the floor: Ensure the surface is free of debris for a smooth installation.
- Measure meticulously: Confirm the dimensions of the bench against the available space to avoid any surprises during installation.
Assembling The Bench Seat
The assembly process is where your project starts to take shape. It’s essential to work methodically to ensure a solid, durable bench that will last for years.
- Follow the instructions: If your bench comes with a manual, use it as your bible. Every step is there for a reason.
- Check all components: Before you dive in, ensure you have all necessary parts and hardware.
- Take your time: Rushed work can lead to mistakes. Patience during assembly leads to better results.
Securing The Bench To The Wall
Anchoring your bench to the wall isn’t just a safety measure; it also provides stability and support for those who will use it.
- Locate the studs: Use a stud finder to ensure the bench is attached to the most supportive parts of the wall.
- Drill pilot holes: This will make attaching the bench easier and prevent the wood from splitting.
- Attach securely: Use the appropriate screws and fasten the bench to the studs for a firm hold.

Adding Comfortable Cushions
Now that your bench is installed, it’s time to make it a place where you’ll want to sit and relax with a cup of coffee or a good book.
- Select the right material: Choose cushions that not only match your decor but are also comfortable and durable.
- Consider washability: Life happens, so opt for covers that can be easily removed and cleaned.
- Set them in place: Arrange the cushions neatly for a tidy and inviting look.
Incorporating Storage Into Your Bench
Storage is a key element of your kitchen nook bench. Proper organization will help maintain the area’s neatness and functionality.
- Use baskets or bins: These can be great for sorting and hiding away items.
- Label for convenience: Knowing where things are will save you time when you’re in a hurry.
- Keep it accessible: Store frequently used items in a way that makes them easy to grab and put back.
Wrapping Up With Aesthetic Enhancements
The installation and functionality are only parts of the picture. You want your bench to be a beautiful addition to your kitchen.
- Choose a color scheme: Pick colors that complement your kitchen and create a cohesive look.
- Add decorative elements: Throw pillows, a throw blanket, or even some artwork above the bench can provide character.
- Think about lighting: A well-placed lamp or overhead lighting can make your nook a highlight of the kitchen.
By carefully following these installation and embellishment steps, your kitchen nook bench seat with storage will be more than just furniture — it will become a central element of your home’s personality and warmth.
Reflect On The Project’s Completion
Successfully crafting your kitchen nook bench is a testament to your DIY skills and vision for your home. Not only does it offer a cozy corner for family meals, but also the clever add-on of storage space maximizes utility in a typically underused area.
Here’s why this project is beneficial:
- Space-Efficiency: This bench nestles neatly into your kitchen’s design, using corners otherwise left empty.
- Customizable Storage: Tailor the storage to suit kitchen gadgets or even non-kitchen items for seamless organization.
- Personal Touch: The choices in material and design imprint your personality into the kitchen space, making it truly yours.
Future Customization And Care
As you delight in the functionality and visual appeal of your new bench seat, remember that its evolution doesn’t end here. Here’s what you can look forward to:
- Seasonal Updates: Change the seat cushions and throws with the seasons or to refresh the décor.
- Ongoing Maintenance: Regular checks and cleaning will ensure the longevity and vibrancy of your bench.
- Additional Enhancements: Consider installing new hardware or painting the bench as trends and preferences evolve.
By embarking on this DIY project, you’ve added a unique feature to your home that blends convenience with charm. Your kitchen nook now invites family gatherings, offers added storage, and stands as a reflection of your craftsmanship and dedication to enhancing your living space.
Keep embracing that creative spirit and enjoy the multitude of moments and memories that your new kitchen nook bench seat with storage will support.
Frequently Asked Questions On How To Build A Kitchen Nook Bench Seat With Storage
What Materials Are Needed For A Nook Bench?
To build a nook bench, you’ll need plywood, wood screws, wood glue, paint or stain, hinges, and upholstery for the seat. Ensure to choose materials that match your kitchen’s decor and can withstand regular use for durability and aesthetics.
How Much Storage Can A Bench Seat Provide?
The storage capacity of a bench seat largely depends on its size and design. Generally, a kitchen nook bench can offer substantial space beneath the seat. It’s ideal for storing kitchen items or dining linens that are not frequently used.
Is Building A Nook Bench A Diy Project?
Yes, building a nook bench is a popular DIY project. With the right tools, materials, and a set of detailed instructions, most DIY enthusiasts can construct a basic bench seat with storage over a weekend.
Can The Bench Seat Match My Kitchen Style?
Absolutely, the bench seat can be customized to match any kitchen style. By selecting materials and finishes that complement your existing decor, you can create a seamless look. You can also add cushions that align with your kitchen’s color scheme.
Conclusion
Crafting a kitchen nook bench seat with storage is a rewarding DIY project. It enhances your home’s charm while boosting functionality. By following the guide provided, you’ll enjoy a cozy, organized space. Embrace this creative journey and reap the dual benefits of comfort and clutter-free living.
Start building your perfect kitchen nook today!


3 Comments